Checkout Links
Integrate the Aghanim to start accepting payments for your game items online through a prebuilt checkout page. A lightweight, portal-based integration used when full API or SDK implementation would be excessive. Though you will need some coding.

Register with Aghanim and link your game
First, register for an Aghanim account. At the end of registration, add the link to your mobile game. It should be published in Apple App Store or Google Play Store.
Set up environment
If you want to make real payments, you are all set as the live mode is used as default. Otherwise, use a sandbox, an isolated test environment, to simulate the Aghanim events to test payments without real money movement. To turn on the sandbox mode, set the Sandbox toggle to the active position.
Sandbox supports card payments only. Alternative methods (PayPal, wallets, local payment methods) appear only in live. See Test payments for the test cards.
Create items
Every Checkout Link is a deep link and associated with a player and an item, they are crucial for the Checkout to work. In a Checkout Link, you can use only the items that are already added to the Dashboard. And all players that aren’t in the Dashboard will be created once the Checkout Link is opened.
When passing an item, it should have a SKU, a unique identifier for the item within your game backend. You can add their prices, currency, sale configuration, and more.
Add an item to the Dashboard so you can use it in a Checkout Link:
- Go to SKU Management → Items.
- Click Add Item. The site will open the Add Item page.
- Enter the item name New item.
- Enter the item SKU new-item-199.
- In the Price block:
- Select the Fiat price type for a real money item.
- Enter the price 1.99.
- Click Add item.
For integration purposes, we have shortened an item setup. Before going live, use every suitable feature while adding items to the Dashboard.
Create Checkout Link
Each Checkout Link is created for one item:
- Go to Integration → Checkout Links.
- Click Add Checkout Link. The site will open the Add Checkout Link window.
- In the general block, enter and select the SKU new-item-199.
- Click Save changes.
To complete the Checkout Link, copy it and replace the player ID placeholder with the value.
https://pay.aghanim.com/link/lnk_eHriLMNNvUxvbFHm?player_id={player_id}
{player_id}Replace the {player_id} placeholder with the actual player ID, then treat the resulting URL as opaque — do not modify the path, append additional query parameters, or reconstruct the URL from its components. Substituting {player_id} is the only client-side transformation supported.
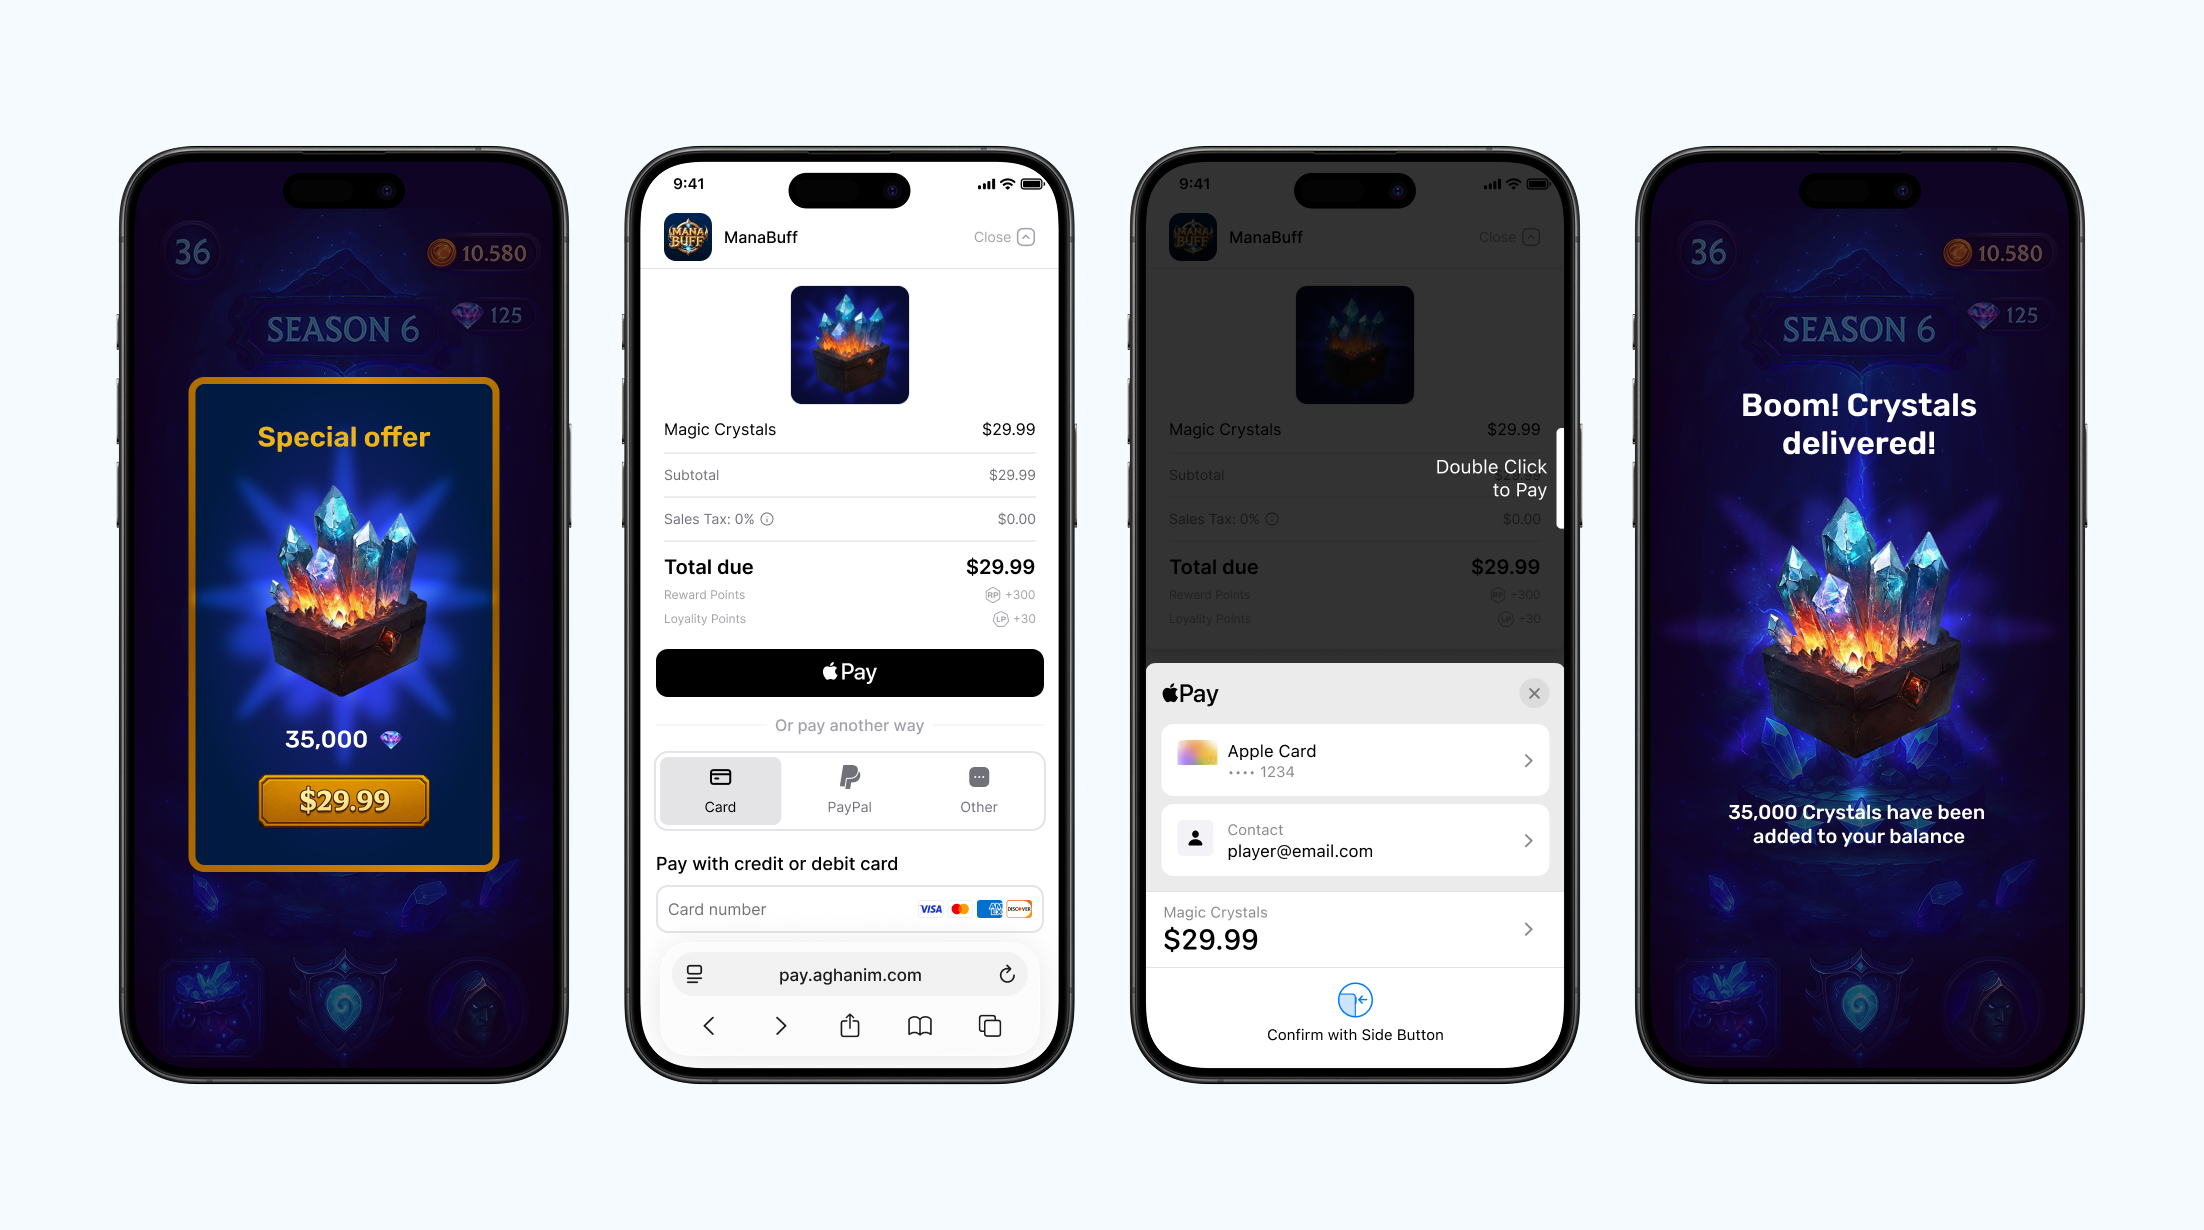
Redirect your player to Checkout page
Add a checkout button to your game and embed in it the created Checkout Link. Once the player clicks it, they will be redirected to the payment form in their browser.
Make payment
Make a payment. If you have set the sandbox mode, use the test card below. In the sandbox, you can make payments only with the test cards — alternative methods like PayPal, wallets, and local payment methods appear only in the live environment. The test cards accept any digits as CVV and any future date as expiry date. Don’t forget to fill in an email address to check the receipt is sent and any postal code as a billing address.
Successful payments
After you complete the payment, you will receive a receipt sent to the specified email address and a transaction record in Aghanim Dashboard → Transactions.
| Card Brand | Card Number | CVV | Expiry date | Country |
|---|---|---|---|---|
| VISA (credit) | 4242 4242 4242 4242 | Any 3 digits | Any future date | GB |
Unsuccessful payments
Make unsuccessful payment just in case you are curious. You will see the transaction in Aghanim Dashboard → Transactions as well.
| Number | CVV | Expiry date | Response code | Description |
|---|---|---|---|---|
4832 2850 6160 9015 | Any 3 digits | Any future date | 16 | Payment declined |
For the live mode, you can find all supported payment methods in Company settings → Payment methods. Turn on or off those you see suitable. Some payment methods are available globally by default. You can’t disable Credit cards, Apple Pay, Google Pay, and PayPal.
In Checkout, the Aghanim evaluates the currency and any restrictions, then dynamically presents only the payment methods available to the player based on evaluation.
When you use the live mode, the payment form shows to the player a setting to save their payment method so they can make a one-click payment in the future.
Handle post-payment events
To complete the Checkout, handle items’ granting and chargebacks on your game backend. To do so, implement a webhook system that accepts the item.add and item.remove webhooks. See the code example with the implementation.
Comply with the Aghanim requirements for these webhooks:
- Use HTTPS schema for the single POST webhook endpoint.
- Check that webhooks are generated and signed by the Aghanim.
- Handle the
idempotency_keyfield in the webhook payload to prevent processing duplicate webhooks. - Respond with the HTTP status codes:
2xxfor successfully processed webhooks.4xxand5xxfor errors.
Grant items to player
The Aghanim sends the item.add webhook to let you know about the purchased items and ask for your permission to grant them to the player.
When the Aghanim has your 2xx answer, it can complete the checkout logic and redirect the player to a deep link if provided.
Support refunds and chargebacks
The Aghanim sends the item.remove webhook when a bank or payment system reverses the transaction, or you have requested refund in Aghanim Dashboard → Transactions. Partial refunds are not supported.
Use suggested implementation
The suggested implementation handles the webhooks mentioned before:
item.addfor granting items. You need it for integration.item.removefor refunds and chargebacks. You might need it for integration.
- Python
- Ruby
- Node.js
- Go
# Use this sample code to handle webhook events in your integration.
#
# 1. Paste this code into a new file `server.py`.
#
# 2. Install dependencies:
#    python -m pip install fastapi[all]
#
# 3. Run the server on http://localhost:8000
#    python server.py

import fastapi, hashlib, hmac, json, typing
from fastapi.responses import JSONResponse

app = fastapi.FastAPI()

@app.post("/webhook")
async def webhook(request: fastapi.Request) -> dict[str, typing.Any]:
    secret_key = "<YOUR_S2S_KEY>"  # Replace with your actual webhook secret key

    raw_payload = await request.body()
    payload = raw_payload.decode()
    timestamp = request.headers["x-aghanim-signature-timestamp"]
    received_signature = request.headers["x-aghanim-signature"]

    if not verify_signature(secret_key, payload, timestamp, received_signature):
        raise fastapi.HTTPException(status_code=403, detail="Invalid signature")

    data = json.loads(payload)
    event_type = data["event_type"]
    event_data = data["event_data"]

    if event_type == "item.add":
        add_item(event_data)
        return {"status": "ok"}

    if event_type == "item.remove":
        remove_item(event_data)
        return {"status": "ok"}

    raise fastapi.HTTPException(status_code=400, detail="Unknown event type")

def verify_signature(secret_key: str, payload: str, timestamp: str, received_signature: str) -> bool:
    signature_data = f"{timestamp}.{payload}"
    computed_hash = hmac.new(secret_key.encode(), signature_data.encode(), hashlib.sha256)
    computed_signature = computed_hash.hexdigest()
    return hmac.compare_digest(computed_signature, received_signature)

def add_item(event_data: dict[str, typing.Any]) -> None:
    # Placeholder logic for processing the event and adding item.
    # In a real application, this function would interact with your database or inventory system.
    player_id = event_data["player_id"]
    for item in event_data["items"]:
      sku = item["sku"]
      print(f"Item {sku} has been credited to player's {player_id} account.")

def remove_item(event_data: dict[str, typing.Any]) -> None:
    # Placeholder logic for processing the event and removing item.
    # In a real application, this function would interact with your database or inventory system.
    player_id = event_data["player_id"]
    for item in event_data["items"]:
      sku = item["sku"]
      print(f"Item {sku} has been removed from player's {player_id} account.")

if __name__ == "__main__":
    import uvicorn
    uvicorn.run(app, host="0.0.0.0", port=8000)
# Use this sample code to handle webhook events in your integration.
#
# 1. Paste this code into a new file `server.rb`.
#
# 2. Install dependencies:
#    gem install sinatra json hmac
#
# 3. Run the server on http://localhost:8000
#    ruby server.rb

require 'sinatra'
require 'json'
require 'openssl'

post '/webhook' do
  secret_key = "<YOUR_S2S_KEY>"  # Replace with your actual webhook secret key

  payload = request.body.read
  timestamp = request.env["HTTP_X_AGHANIM_SIGNATURE_TIMESTAMP"]
  received_signature = request.env["HTTP_X_AGHANIM_SIGNATURE"]

  unless verify_signature(secret_key, payload, timestamp, received_signature)
    halt 403, "Invalid signature"
  end

  data = JSON.parse(payload)
  event_type = data["event_type"]
  event_data = data["event_data"]

  if event_type == "item.add"
    add_item(event_data)
    return { status: "ok" }.to_json
  end

  if event_type == "item.remove"
    remove_item(event_data)
    return { status: "ok" }.to_json
  end

  halt 400, "Unknown event type"
end

def verify_signature(secret_key, payload, timestamp, received_signature)
  signature_data = "#{timestamp}.#{payload}"
  computed_signature = OpenSSL::HMAC.hexdigest('sha256', secret_key, signature_data)
  OpenSSL.secure_compare(computed_signature, received_signature)
end

def add_item(event_data)
  # Placeholder logic for processing the event and adding item.
  # In a real application, this function would interact with your database or inventory system.
  player_id = event_data["player_id"]
  for item in event_data["items"] do
    sku = item["sku"]
    puts "Item #{sku} has been credited to player's #{player_id} account."
  end
end

def remove_item(event_data)
  # Placeholder logic for processing the event and removing item.
  # In a real application, this function would interact with your database or inventory system.
  player_id = event_data["player_id"]
  for item in event_data["items"] do
    sku = item["sku"]
    puts "Item #{sku} has been removed from player's #{player_id} account."
  end
end

if __FILE__ == $0
  require 'sinatra'
  set :bind, '0.0.0.0'
  set :port, 8000
end
// Use this sample code to handle webhook events in your integration.
//
// 1. Paste this code into a new file `server.js`.
//
// 2. Install dependencies:
//    npm install express
//
// 3. Run the server on http://localhost:8000
//    node server.js

const express = require('express');
const crypto = require('crypto');

const app = express();

app.post('/webhook', express.raw({ type: "*/*" }), async (req, res) => {
  const secretKey = '<YOUR_S2S_KEY>'; // Replace with your actual webhook secret key

  const rawPayload = req.body;
  const timestamp = req.headers['x-aghanim-signature-timestamp'];
  const receivedSignature = req.headers['x-aghanim-signature'];

  if (!verifySignature(secretKey, rawPayload, timestamp, receivedSignature)) {
    return res.status(403).send('Invalid signature');
  }

  const payload = JSON.parse(req.body);
  const { event_type, event_data } = payload;

  if (event_type === 'item.add') {
    addItem(event_data);
    return res.json({ status: 'ok' });
  }

  if (event_type === 'item.remove') {
    removeItem(event_data);
    return res.json({ status: 'ok' });
  }

  return res.status(400).send('Unknown event type');
});

function verifySignature(secretKey, payload, timestamp, receivedSignature) {
  const signatureData = `${timestamp}.${payload}`;
  const computedSignature = crypto
    .createHmac('sha256', secretKey)
    .update(signatureData)
    .digest('hex');
  return crypto.timingSafeEqual(Buffer.from(computedSignature), Buffer.from(receivedSignature));
}

function addItem(event_data) {
  // Placeholder logic for processing the event and adding item.
  // In a real application, this function would interact with your database or inventory system.
  const playerId = event_data.player_id;
  for (const item of event_data.items) {
    const sku = item.sku;
    console.log(`Item ${item.sku} has been credited to player's ${playerId} account.`);
 }
}

function removeItem(event_data) {
  // Placeholder logic for processing the event and removing item.
  // In a real application, this function would interact with your database or inventory system.
  const playerId = event_data.player_id;
  for (const item of event_data.items) {
    const sku = item.sku;
    console.log(`Item ${item.sku} has been removed from player's ${playerId} account.`);
 }
}

app.listen(8000, () => {
  console.log('Server is running on http://localhost:8000');
});
// Use this sample code to handle webhook events in your integration.
//
// 1. Paste this code into a new file `server.go`.
//
// 2. Run the server on http://localhost:8000
//    go run server.go

package main

import (
  "crypto/hmac"
  "crypto/sha256"
  "encoding/hex"
  "encoding/json"
  "fmt"
  "io/ioutil"
  "net/http"
)

func webhookHandler(w http.ResponseWriter, r *http.Request) {
  secretKey := "<YOUR_S2S_KEY>"  // Replace with your actual webhook secret key

  rawPayload, _ := ioutil.ReadAll(r.Body)
  payload := string(rawPayload)
  timestamp := r.Header.Get("X-Aghanim-Signature-Timestamp")
  receivedSignature := r.Header.Get("X-Aghanim-Signature")

  if !verifySignature(secretKey, payload, timestamp, receivedSignature) {
    http.Error(w, "Invalid signature", http.StatusForbidden)
    return
  }

  var data map[string]interface{}
  if err := json.Unmarshal(rawPayload, &data); err != nil {
    http.Error(w, "Invalid payload", http.StatusBadRequest)
    return
  }

  eventType := data["event_type"].(string)
  eventData := data["event_data"].(map[string]interface{})

  if eventType == "item.add" {
    addItem(eventData)
    w.WriteHeader(http.StatusOK)
    json.NewEncoder(w).Encode(map[string]string{"status": "ok"})
    return
  }

  if eventType == "item.remove" {
    removeItem(eventData)
    w.WriteHeader(http.StatusOK)
    json.NewEncoder(w).Encode(map[string]string{"status": "ok"})
    return
  }

  http.Error(w, "Unknown event type", http.StatusBadRequest)
}

func verifySignature(secretKey, payload, timestamp, receivedSignature string) bool {
  signatureData := fmt.Sprintf("%s.%s", timestamp, payload)
  mac := hmac.New(sha256.New, []byte(secretKey))
  mac.Write([]byte(signatureData))
  computedSignature := hex.EncodeToString(mac.Sum(nil))
  return hmac.Equal([]byte(computedSignature), []byte(receivedSignature))
}

func addItem(eventData map[string]interface{}) {
  // Placeholder logic for processing the event and adding item.
  // In a real application, this function would interact with your database or inventory system.
  playerID := eventData["player_id"].(string)
  items := eventData["items"].([]interface{})
  for _, item := range items {
    itemMap := item.(map[string]interface{})
    sku := itemMap["sku"].(string)
    fmt.Printf("Item %s has been credited to player's %s account.\\n", sku, playerID)
  }
}

func removeItem(eventData map[string]interface{}) {
  // Placeholder logic for processing the event and removing item.
  // In a real application, this function would interact with your database or inventory system.
  playerID := eventData["player_id"].(string)
  items := eventData["items"].([]interface{})
  for _, item := range items {
    itemMap := item.(map[string]interface{})
    sku := itemMap["sku"].(string)
    fmt.Printf("Item %s has been removed from player's %s account.\\n", sku, playerID)
  }
}

func main() {
  http.HandleFunc("/webhook", webhookHandler)
  fmt.Println("Server is running on http://localhost:8000")
  http.ListenAndServe(":8000", nil)
}
Add webhook endpoint to Aghanim
When the webhook handling is ready, add the endpoint to the Dashboard so the Aghanim could start sending the events:
- Go to Integration → Webhooks.
- Click Add webhook. The site will open the Create webhook window.
- Cope and paste the URL
https://<YOUR_DOMAIN>/webhook. - Click Select events. The site will open the Select events to send window.
- Expand the Main class and select the Item add, Item remove checkboxes.
- Click Apply.
- Click Add. The site will redirect you to the webhook page.
- Click Back.
Test your integration
After you have handled the webhooks, check that the purchased item is in your inventory. That’s all.
Next steps
- See Currency codes and minor units to learn how the Aghanim represents monetary amounts.
- See Payment Webhook to learn about the payment progress when the player visits the payment form.
Need help?
Contact our integration team at integration@aghanim.com