Unity
集成Aghanim以便通过预构建的结账页面在线接受您的游戏物品付款。 Unity的结账使用我们的Unity SDK。 要正常工作,您需要:
- Unity 2022.3.62f2 LTS 或更高版本。
- Android 最低 API 级别 24。
- EDM4U 最低版本 1.2.184。
- Gradle 8.11.1 和 AGP 8.10.0,与
com.android.tools.build:gradle类路径。 - 构建工具 35.0.0 或更高版本。
- JDK 版本 17。
- NewtonJson 3.2.1 或更高版本。
Android. Default browser

Register with Aghanim and link your game
First, register for an Aghanim account. At the end of registration, add the link to your mobile game. It should be published in Apple App Store or Google Play Store.
Set up environment
If you want to make real payments, you are all set as the live mode is used as default. Otherwise, use a sandbox, an isolated test environment, to simulate the Aghanim events to test payments without real money movement. To turn on the sandbox mode, set the Sandbox toggle to the active position.
Sandbox supports card payments only. Alternative methods (PayPal, wallets, local payment methods) appear only in live. See Test payments for the test cards.
While integrating, you will need an SDK key to authenticate requests to the Aghanim. Keep in mind that the sandbox and live modes have different keys. Find the SDK key in Integration → API keys.
Configure game client-side
Configure your game client to work with the Checkout by setting up the SDK and implementing the necessary code to process its methods.
Add SDK scoped registries
Additionally to the Aghanim resources, the SDK uses EDM (External Dependency Manager) for Unity to update and resolve Android (Gradle and Maven) и iOS (CocoaPods) dependencies. Add the registries to Unity settings so it will know where to find their dependencies.
In the Unity Editor:
- Select Edit → Project Settings.
- Go to Package Manager.
- Expand the Scoped Registries pane.
- Add the Aghanim registry:
- In the pane for a scoped registry name, click +.
- Copy and paste the registry details:
- For the Name filed, use Aghanim Registry.
- For the URL filed, use https://us-central1-npm.pkg.dev/ag-registry/aghanim.
- For the Scopes filed, use com.aghanim.
- Click Save.
- Add the EDM registry:
- In the pane for a scoped registry name, click +.
- Copy and paste the registry details:
- For the Name filed, use package.openupm.com.
- For the URL filed, use https://package.openupm.com.
- For the Scopes filed, use com.google.external-dependency-manager.
- Click Save.
Set Android Minimum API Level
To comply with the SDK software requirements, set Android Minimum API Level 24.
In the Unity Editor:
- Select Edit → Project Settings.
- Go to Player.
- Click the Android settings tab.
- Expand the Other Settings pane.
- Scroll to the Identification group.
- In the Minimum API Level field, select API level 24.
Enable Custom Gradle templates
On Android, Unity handles the project builds by Gradle. To give the SDK full access to Gradle builds, enable some templates to customize the Gradle configuration.
In the Unity Editor:
- Select Edit → Project Settings.
- Go to Player.
- Click the Android settings tab.
- Expand the Publishing settings pane.
- Scroll to the Build group.
- Select the checkboxes:
- Custom Main Gradle Template.
- Custom Base Gradle Template.
- Custom Gradle Properties Template.
Install SDK
Additionally to the Aghanim resources, the SDK uses EDM (External Dependency Manager) for Unity to update and resolve Android (Gradle and Maven) и iOS (CocoaPods) dependencies. Add the registries to Unity settings so it will know where to find their dependencies.
In the Unity Editor:
- Select Window → Package Manager.
- In the window, select + → Add package by name.
- Copy and paste the SDK details:
- For the Name filed, use com.aghanim.sdk.
- For the Version field, use 1.13.2.
- Click Add.
- Wait for the Aghanim SDK and EDM to be installed.
- Close the window.
For Android, to verify that the SDK is installed in the Unity Editor:
- Select Assets → External Dependency Manager → Android Resolver → Force Resolve.
- Get the Android Dependencies window with the Resolution Succeeded message.
- Close the window.
Configure EDM
To let EDM declare dependencies in the mainTemplate.gradle file rather than download dependency artifacts into the Unity project, configure EDM in the Unity Editor:
- Select Assets → External Dependency Manager → Android Resolver → Settings.
- In the window:
- Clear the Enable Auto-Resolution checkbox.
- Select the Patch mainTemplate.gradle checkbox.
- Click OK.
Initialize SDK
To use the SDK, initialize it once in the lifetime of the game process:
- Copy the SDK key from Integration → API keys.
- Create
AghanimConfigwith the SDK key and pass it toAghanim.Initialize:
- C#
using Aghanim;

private void Awake()
{
    var config = new AghanimConfig("YOUR_SDK_API_KEY");
    Aghanim.Initialize(config);
}
With the SDK, you can read its logs from one of the supported levels. The SDK writes all log messages into Android logcat, iOS Xcode console, and Unity Editor → Unity Console, the default tools for logging.
- Simple
- Advanced
The simple usage of the SDK log messages means setting the log level you are interested in the most:
DEBUG— detailed debug information on almost every event.INFO— general information on the SDK instance state and its events.WARNING— warnings and recoverable errors.ERROR— critical and fatal errors.NONE— no logging. Used by default.
- C#
using Aghanim;

private void Awake()
{
    var config = new AghanimConfig("YOUR_SDK_API_KEY")
    {
        MinLogLevel = AghanimLogLevel.DEBUG
    };
    Aghanim.Initialize(config);
}
You can reroute the SDK logs from the default tools to the system you have chosen for logging. The SDK supports these log levels:
DEBUG— detailed debug information on almost every event.INFO— general information on the SDK instance state and its events.WARNING— warnings and recoverable errors.ERROR— critical and fatal errors.NONE— no logging. Used by default.
First, provide a custom logger implementation for the SDK interface.
- C#
using Aghanim;

public class MyLogger : IAghanimLogger
{
    public void LogDebug(string message, Exception exception = null)
    {
        // TODO: Send debug messages to your logging system
    }

    public void LogInfo(string message, Exception exception = null)
    {
        // TODO: Send information messages to your logging system
    }

    public void LogWarning(string message, Exception exception = null)
    {
        // TODO: Send warning messages to your logging system
    }

    public void LogError(string message, Exception exception = null)
    {
        // TODO: Send error messages to your logging system
    }
}
After, use the implementation in the SDK initialization.
- C#
using Aghanim;

private void Awake()
{
    var config = new AghanimConfig("YOUR_SDK_API_KEY")
    {
        MinLogLevel = AghanimLogLevel.DEBUG,
        Logger = new MyLogger()
    };
    Aghanim.Initialize(config);
}
Configure player ID
Since a mobile game has one instance per device, the SDK allows to set the player ID once to use it in all following method calls.
When your game client has the player ID, set it for the current SDK instance.
- C#
Aghanim.SetPlayerId(playerId);
Create item
The integration needs the items to be added to the Dashboard. When creating items, each should have its SKU, a unique identifier for the item within your game backend. You can add their prices, currency, sale configuration, and more.
To add an item to the Dashboard:
- Go to SKU Management → Items.
- Click Add Item. The site will open the Add Item page.
- Enter the item name New item.
- Enter the item SKU items.new.ba68a028-2d51-46b4-a854-68fc16af328a.
- In the Price block:
- Select the Fiat price type for a real money item.
- Enter the price 1.99.
- Click Add item.
For integration purposes, we have shortened an item setup. Before going live, use every suitable feature while adding items to the Dashboard.
Get items with localized prices
The SDK retrieves items created in the Dashboard with localized prices based on the player's region. Use this to display accurate prices in your in-game store before the player proceeds to checkout.
- C#
Aghanim.GetItems(
    skus: new List<string> { "items.new.ba68a028-2d51-46b4-a854-68fc16af328a" },
    onSuccess: (items) =>
    {
        foreach (var item in items)
        {
            // Use item.Name, item.Price.Display, item.ImageUrl to populate your store
            Debug.Log($"{item.Name}: {item.Price.Display}");
        }
    },
    onError: (error) =>
    {
        // Log debug information for troubleshooting
        Debug.LogError($"Failed to get items: {error}");
        // TODO: Handle error
    }
);
Create Checkout item
It is time to create a variable that represents the items to be purchased.
- C#
var items = new List<CheckoutItem>
{
    new CheckoutItem("items.new.ba68a028-2d51-46b4-a854-68fc16af328a")
};
Configure deep links
As the SDK launches the Checkout in the browser, the player needs to be back to your app once they complete the payment. To return the player to, the SDK needs you to specify deep links for the app.
- App & Universal Links
- Custom Schemes
With Android App Links and iOS Universal Links, the player goes directly to the app without any additional clicks. Links use standard HTTPS URLs and the operating system verifies their domain. It makes this approach secure and more suitable for the production environment. We recommend to use it for better players’ experience.
Let’s configure App Links first. Create a variable for the deep link URL. We will use it later.
- C#
string backToGameUrl = "https://<YOUR_DOMAIN>/checkout-complete";
The Android SDK can trust the deep links and their domain only when the domain is hosted on a server. The server should have the assetlinks.json file containing this domain information. Host the file at https://<YOUR_DOMAIN>/.well-known/assetlinks.json. The file acts as a bridge to verify the authenticity of the links’ domain and your app by the Android SDK.
- assetlinks.json
[{
  "relation": ["delegate_permission/common.handle_all_urls"],
  "target": {
    "namespace": "android_app",
    "package_name": "com.<YOUR_COMPANY>.<YOUR_APP>",
    "sha256_cert_fingerprints": ["<YOUR_APP_FINGERPRINT>"]
  }
}]
The Android SDK needs to know that the deep links lead to your app. To create this connection, add an intent filter in the manifest.
- AndroidManifest.xml
<activity android:name=".MainActivity">
    <intent-filter android:autoVerify="true">
       <action android:name="android.intent.action.VIEW" />
       <category android:name="android.intent.category.DEFAULT" />
       <category android:name="android.intent.category.BROWSABLE" />

        <!-- URL parts from backToGameUrl -->
       <data
           android:scheme="https"
           android:host="<YOUR_DOMAIN>"
           android:pathPrefix="/checkout"
       />
    </intent-filter>
</activity>
Since Unity has the intent filter configuration, no need to handle the deep link in the Activity.
Now, it is Universal Links turn. After building the Xcode project from Unity, open it in Xcode to add the Associated Domains capability:
- Select your app target in the project editor.
- Go to the Signing & Capabilities tab.
- Click + Capability and select Associated Domains.
- Click the Add (+) button at the bottom of the Domains table and add
applinks:<YOUR_DOMAIN>. Include only the desired subdomain and the top-level domain. Don't include path and query components or a trailing slash.
To avoid repeating this on every rebuild, you can automate it with a PostProcessBuild script using ProjectCapabilityManager.AddAssociatedDomains():
- C#
using UnityEditor;
using UnityEditor.Callbacks;
using UnityEditor.iOS.Xcode;

public class Sample_AddAssociatedDomains
{
    [PostProcessBuild]
    public static void OnPostprocessBuild(BuildTarget buildTarget, string pathToBuiltProject)
    {
        // Stop processing if build target isn't iOS

        if (buildTarget != BuildTarget.iOS)
            return;

        // Initialize PBXProject
        var projectPath = PBXProject.GetPBXProjectPath(pathToBuiltProject);
        PBXProject pbxProject = new PBXProject();
        pbxProject.ReadFromFile(projectPath);

        // Get Main target GUID
        string mainTargetGuid = pbxProject.GetUnityMainTargetGuid();

        // Check if there's already an entitlements file created and use it. If not, create a new file called Example.entitlements
        string entitlementsFile = pbxProject.GetBuildPropertyForAnyConfig(mainTargetGuid, "CODE_SIGN_ENTITLEMENTS");
        if (entitlementsFile == null)
        {
            entitlementsFile = string.Format("Example.entitlements");
        }

        // Initialize ProjectCapabilityManager
        ProjectCapabilityManager capabilityManager = new ProjectCapabilityManager(projectPath, entitlementsFile, targetGuid: mainTargetGuid);

        // Add 'Associated Domains' capability and pass the chosen domains as a string array
        string[] domains = new string[] { "applinks:<YOUR_DOMAIN>" };
        capabilityManager.AddAssociatedDomains(domains);

        // Call WriteToFile to save the changes to project file
        capabilityManager.WriteToFile();
    }

}
iOS also requires domain verification. Create a file named apple-app-site-association (without an extension) and host it at https://<YOUR_DOMAIN>/.well-known/apple-app-site-association. The appIDs value uses the format <Application Identifier Prefix>.<Bundle Identifier> as documented in Supporting Associated Domains.
- apple-app-site-association
{
  "applinks": {
    "details": [
      {
        "appIDs": ["ABCDE12345.com.example.mygame"],
        "components": [
          {
            "/": "/checkout*"
          }
        ]
      }
    ]
  }
}
- You must host the file using HTTPS with a valid certificate and with no redirects.
- If your site uses multiple subdomains, each requires its own entry in the Associated Domains Entitlement, and each must serve its own
apple-app-site-associationfile. - Since iOS 14, apps send requests for the file to an Apple-managed CDN instead of directly to your web server. The CDN requests the file within 24 hours. Devices check for updates approximately once per week after app installation. During development, if your server is unreachable from the public internet, use the alternate mode to bypass the CDN:
applinks:<YOUR_DOMAIN>?mode=developer.
Custom schemes may show a dialog asking the player if they want to open the app. Custom schemes are easier to set up but don’t provide the same security level. It makes this approach suitable for the development and testing environment.
Let’s configure Custom Schemes for Android first. Create a variable for the deep link. We will use it later.
- C#
string backToGameUrl = "myapp://checkout-complete";
The Android SDK needs to know the full deep link and its scheme. Only knowing the scheme, the Android SDK is able to recognize that the deep link leads back to your app and can open it. To create this connection, add an intent filter to the manifest.
- AndroidManifest.xml
<activity android:name=".MainActivity">
    <intent-filter>
        <action android:name="android.intent.action.VIEW" />
        <category android:name="android.intent.category.DEFAULT" />
        <category android:name="android.intent.category.BROWSABLE" />

        <!-- Deep link scheme from backToGameUrl -->
        <data android:scheme="myapp" />
    </intent-filter>
</activity>
Since Unity has the intent filter configuration, no need to handle the deep link in the Activity.
In iOS, Custom Schemes work only when they are registered in the Info.plist file. Add the deep link scheme to the file directly via Xcode:
- In the Info tab, find or add the URL Types section.
- Add a new record and paste
myapp.
Xcode will fill the Info.plist file as presented below.
- Info.plist
<key>CFBundleURLTypes</key>
<array>
    <dict>
        <key>CFBundleURLSchemes</key>
        <array>
            <!-- Deep link scheme from backToGameUrl -->
            <string>myapp</string>
        </array>
    </dict>
</array>
Create Checkout params
When all data variables are ready, create another one that represents Checkout params. Checkout params are the programmatic representation of what the player sees when they are on the payment form. Checkout params are associated with a player and items, they are crucial for the Checkout to work. You can use the existing player from your game or create them at runtime. At this point, you should have the Price template ID.
- C#
var checkoutParams = new CheckoutParams(
    items: items,
    backToGameUrl: backToGameUrl,
    // Optional. Locale for texts’ localization. Default is system locale
    locale: Locale.en
);
You can attach custom metadata to the Checkout for item tracking purposes. You can access it through webhooks and in API responses from the Aghanim. Metadata has a structure of “key-value” pairs.
- C#
var metadata = new Dictionary<string, string>
{
    { "campaign", "winter_sale" },
    { "source", "mobile_app" },
    { "user_segment", "premium" },
    { "ab_test_variant", "variant_a" },
    { "player_level", "42" }
};

var checkoutParams = new CheckoutParams(
    items: items,
    backToGameUrl: backToGameUrl,
    metadata: metadata
);
You can choose the behavior of redirecting the player after they have completed the payment successfully. The difference in the provided by the SDK modes is a delay before redirecting or absence of redirecting.
- Immediate
- Delayed
- No redirect
When the player has completed the payment, the SDK redirects them immediately to the deep link from backToGameUrl.
- C#
using Aghanim.Scripts.Models.Orders;

var redirectSettings = new RedirectSettings(
    mode: RedirectMode.Immediate
);

var checkoutParams = new CheckoutParams(
    items: items,
    backToGameUrl: backToGameUrl,
    redirectSettings: redirectSettings
);
When the player has completed the payment, the SDK shows the screen for the successful payment and then redirects the player to the deep link from backToGameUrl.
- C#
using Aghanim.Scripts.Models.Orders;

var redirectSettings = new RedirectSettings(
    mode: RedirectMode.Delayed,
    // Optional. Seconds to delay for. Default is 5 seconds
    delaySeconds: 5
);

var checkoutParams = new CheckoutParams(
    items: items,
    backToGameUrl: backToGameUrl,
    redirectSettings: redirectSettings
);
When the player has completed the payment, they stay on the screen for the successful payment. To exit it, they manually close it or navigate away. After, you should redirect them to the deep link from backToGameUrl by yourself.
- C#
using Aghanim.Scripts.Models.Orders;

var redirectSettings = new RedirectSettings(
    mode: RedirectMode.NoRedirect
);

var checkoutParams = new CheckoutParams(
    items: items,
    backToGameUrl: backToGameUrl,
    redirectSettings: redirectSettings
);
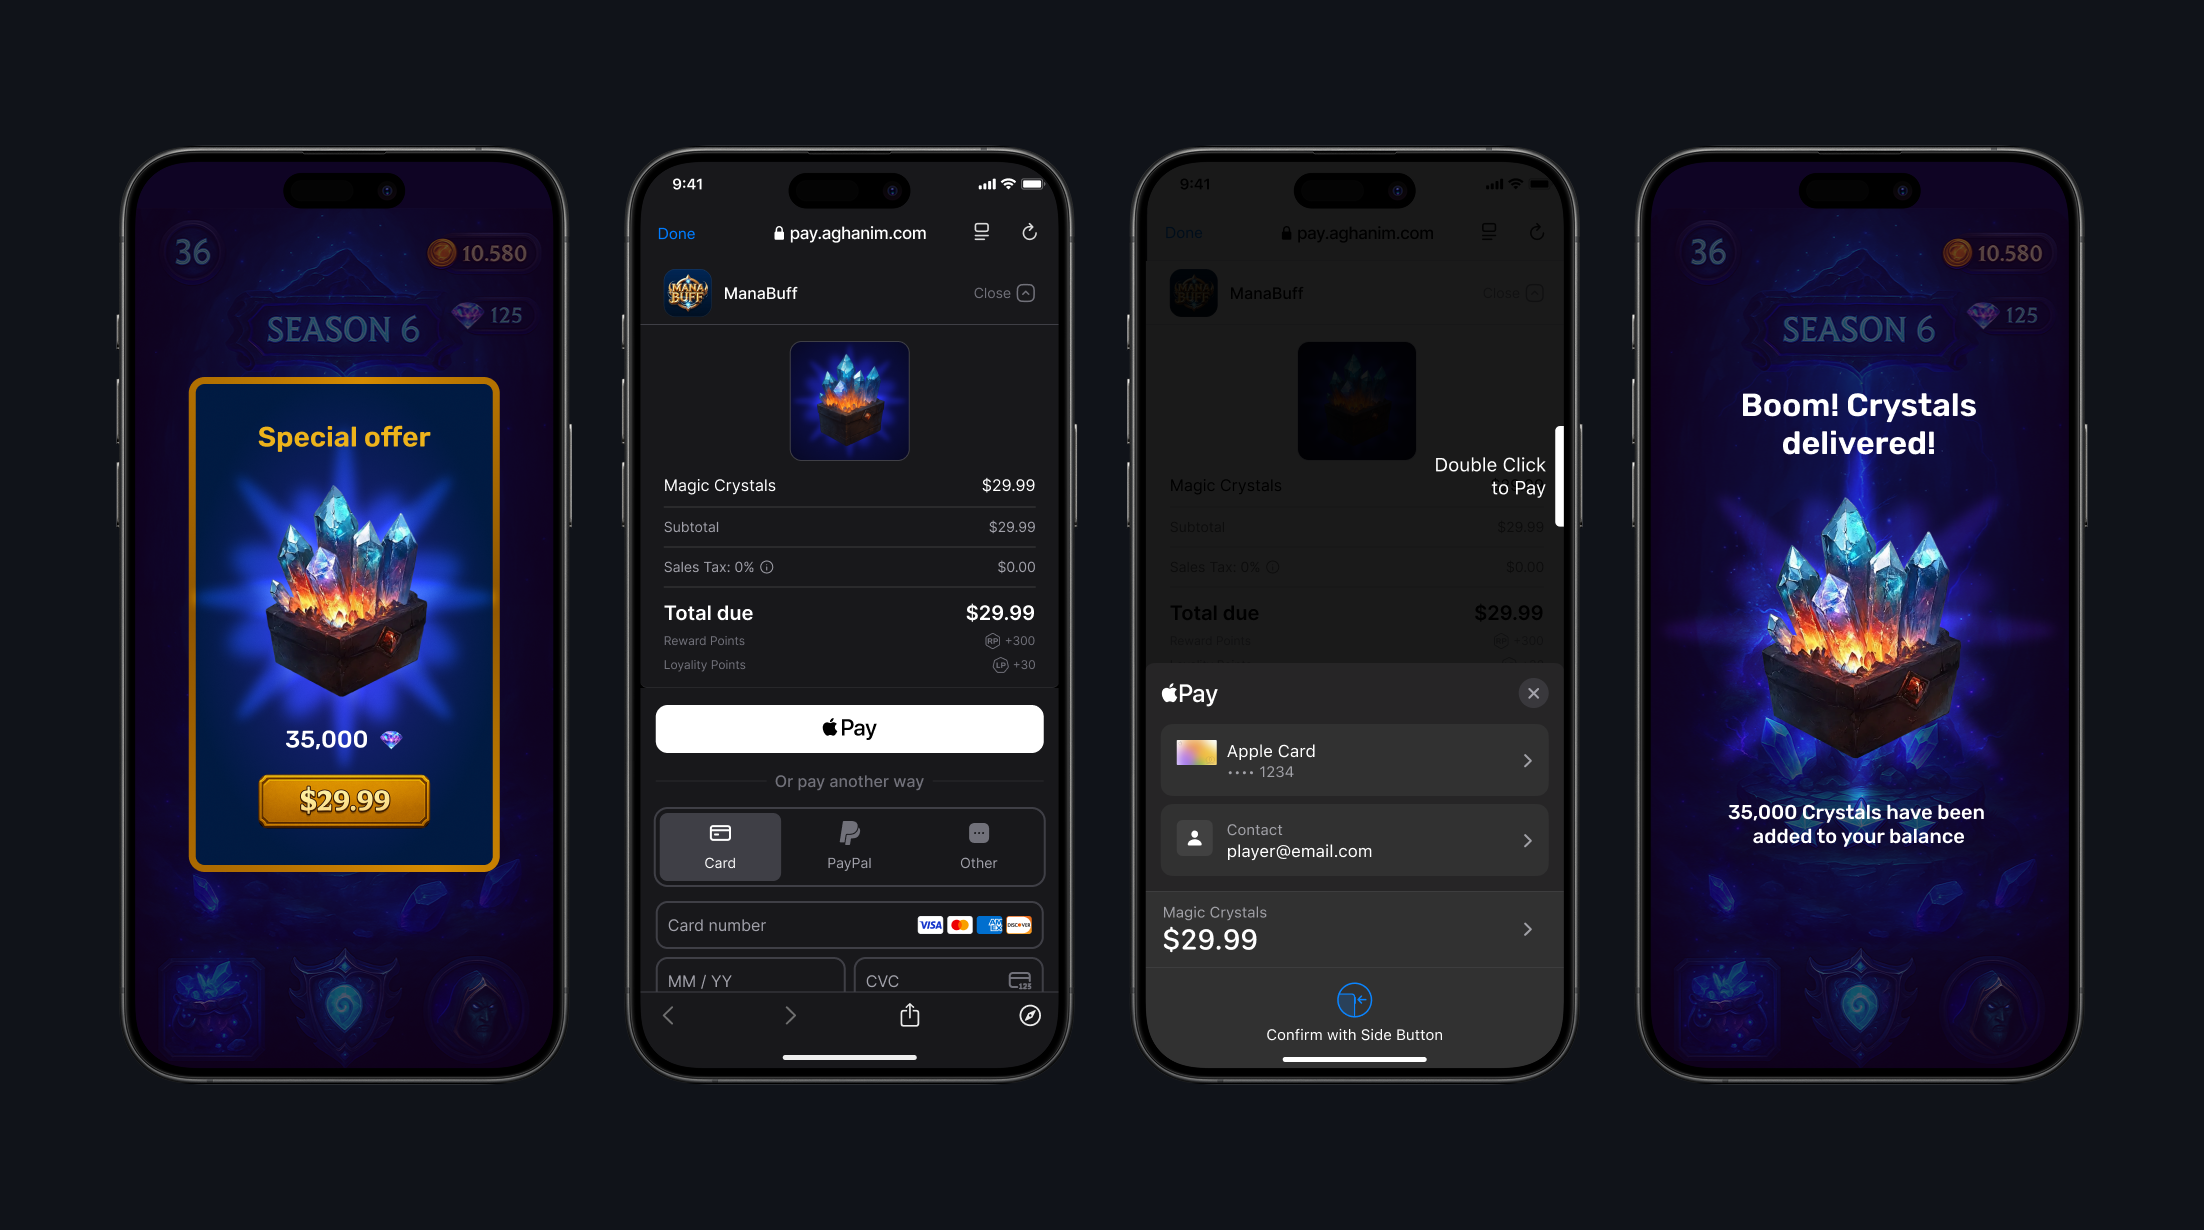
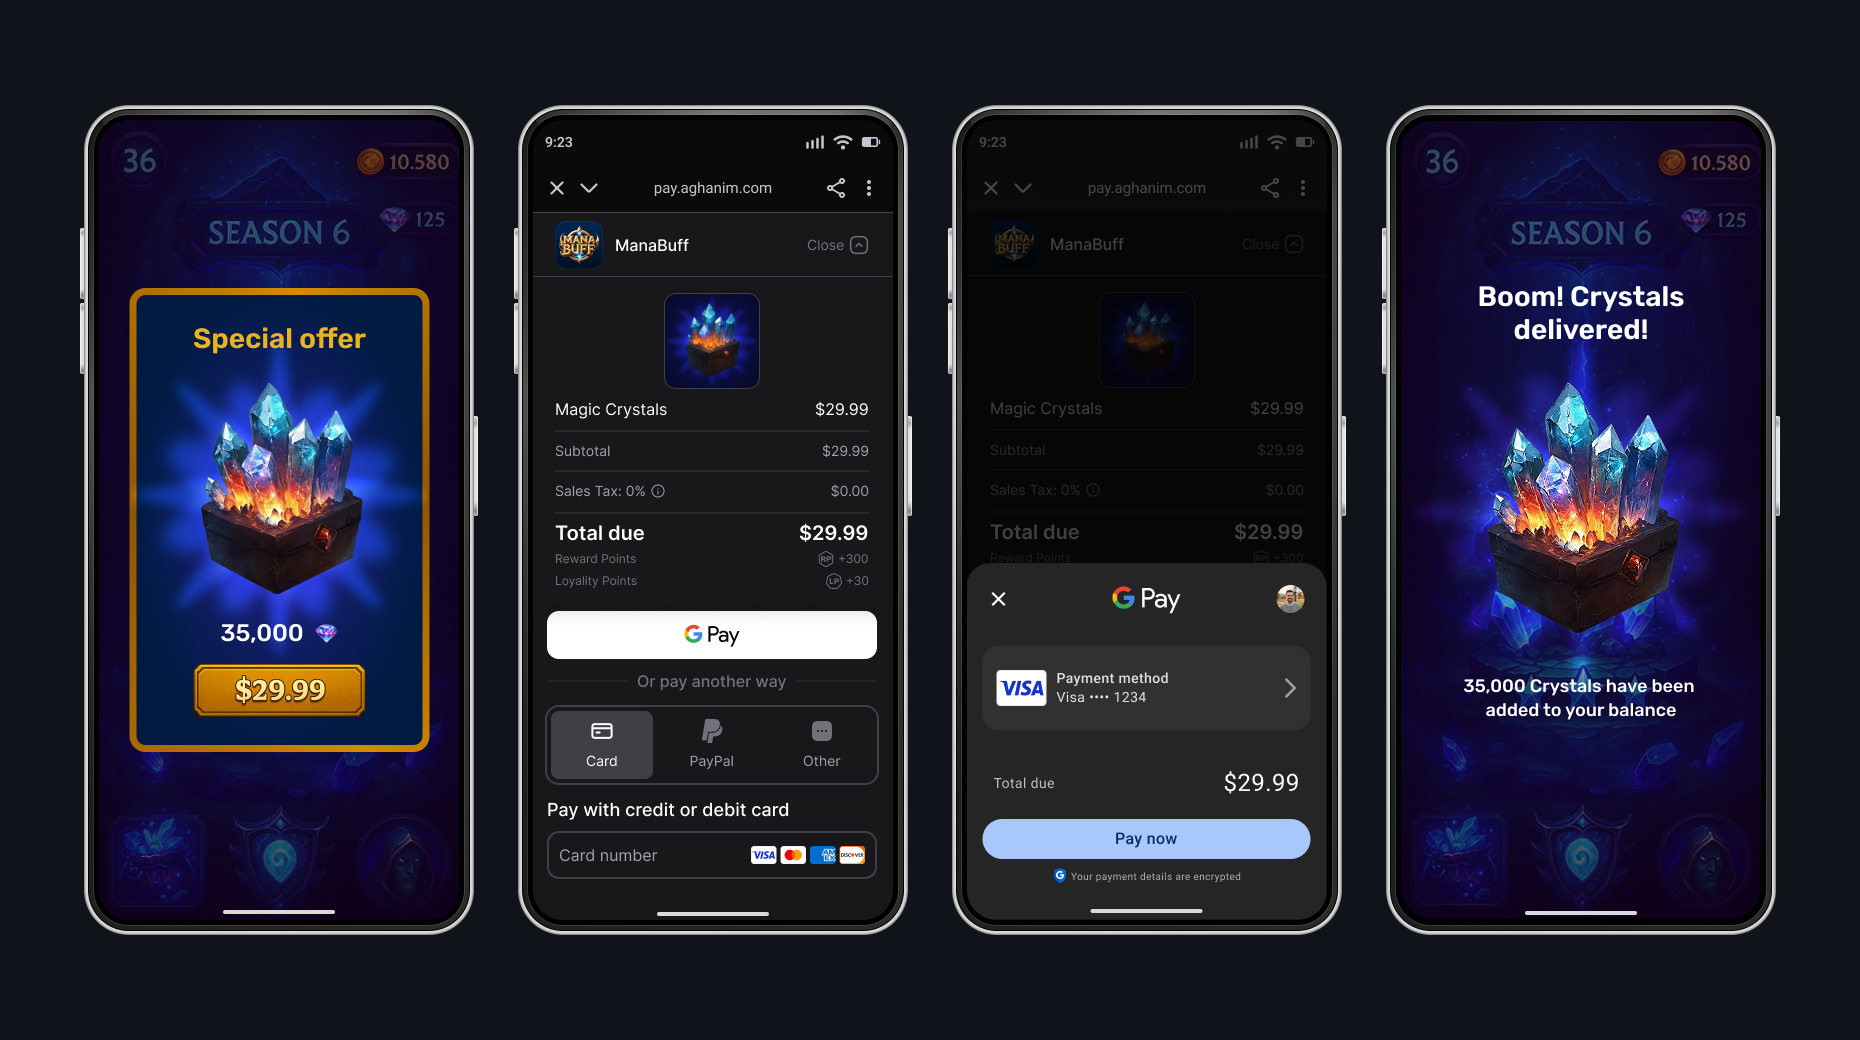
You can set the appearance mode for the Checkout UI. The SDK supports automatic detection based on the system setting, or you can force a specific mode.
- Auto
- Dark
- Light
The SDK automatically detects and applies the appropriate appearance mode based on the system setting.
- C#
var uiSettings = new UiSettings(
    mode: UiMode.Auto
);

var checkoutParams = new CheckoutParams(
    items: items,
    uiSettings: uiSettings
);
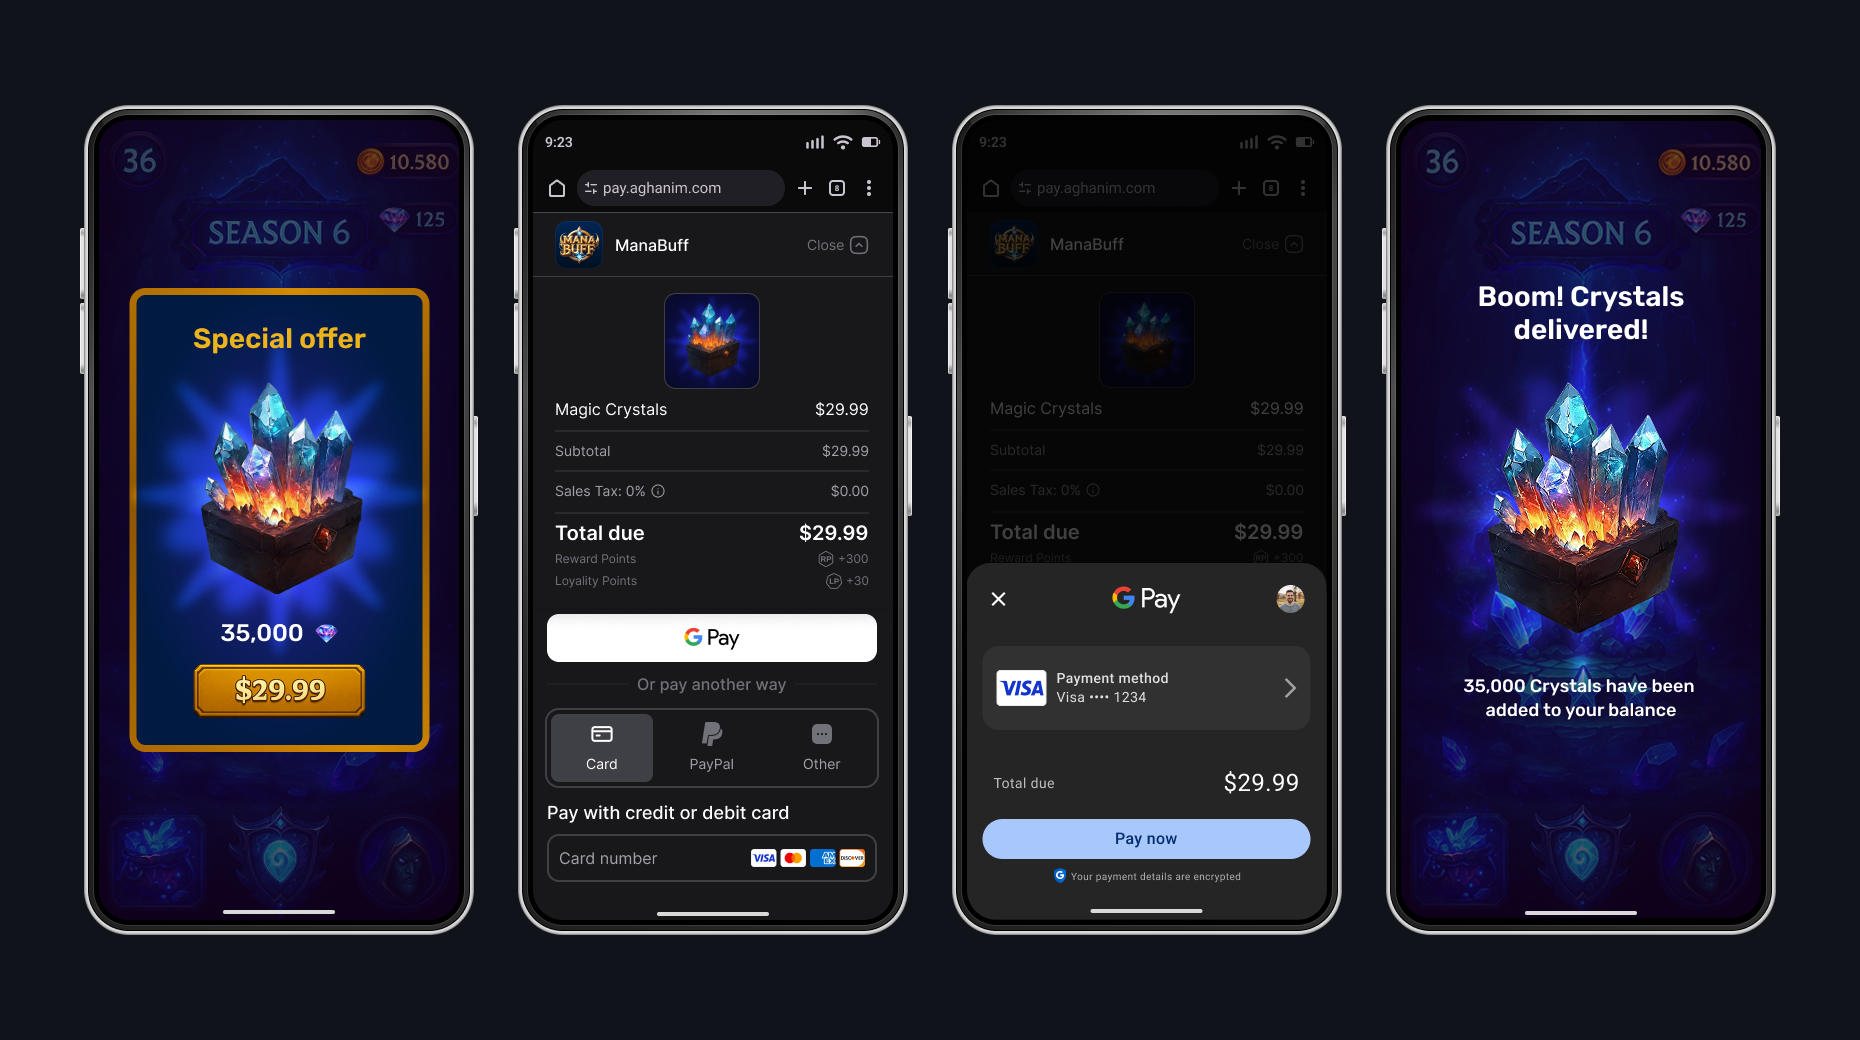
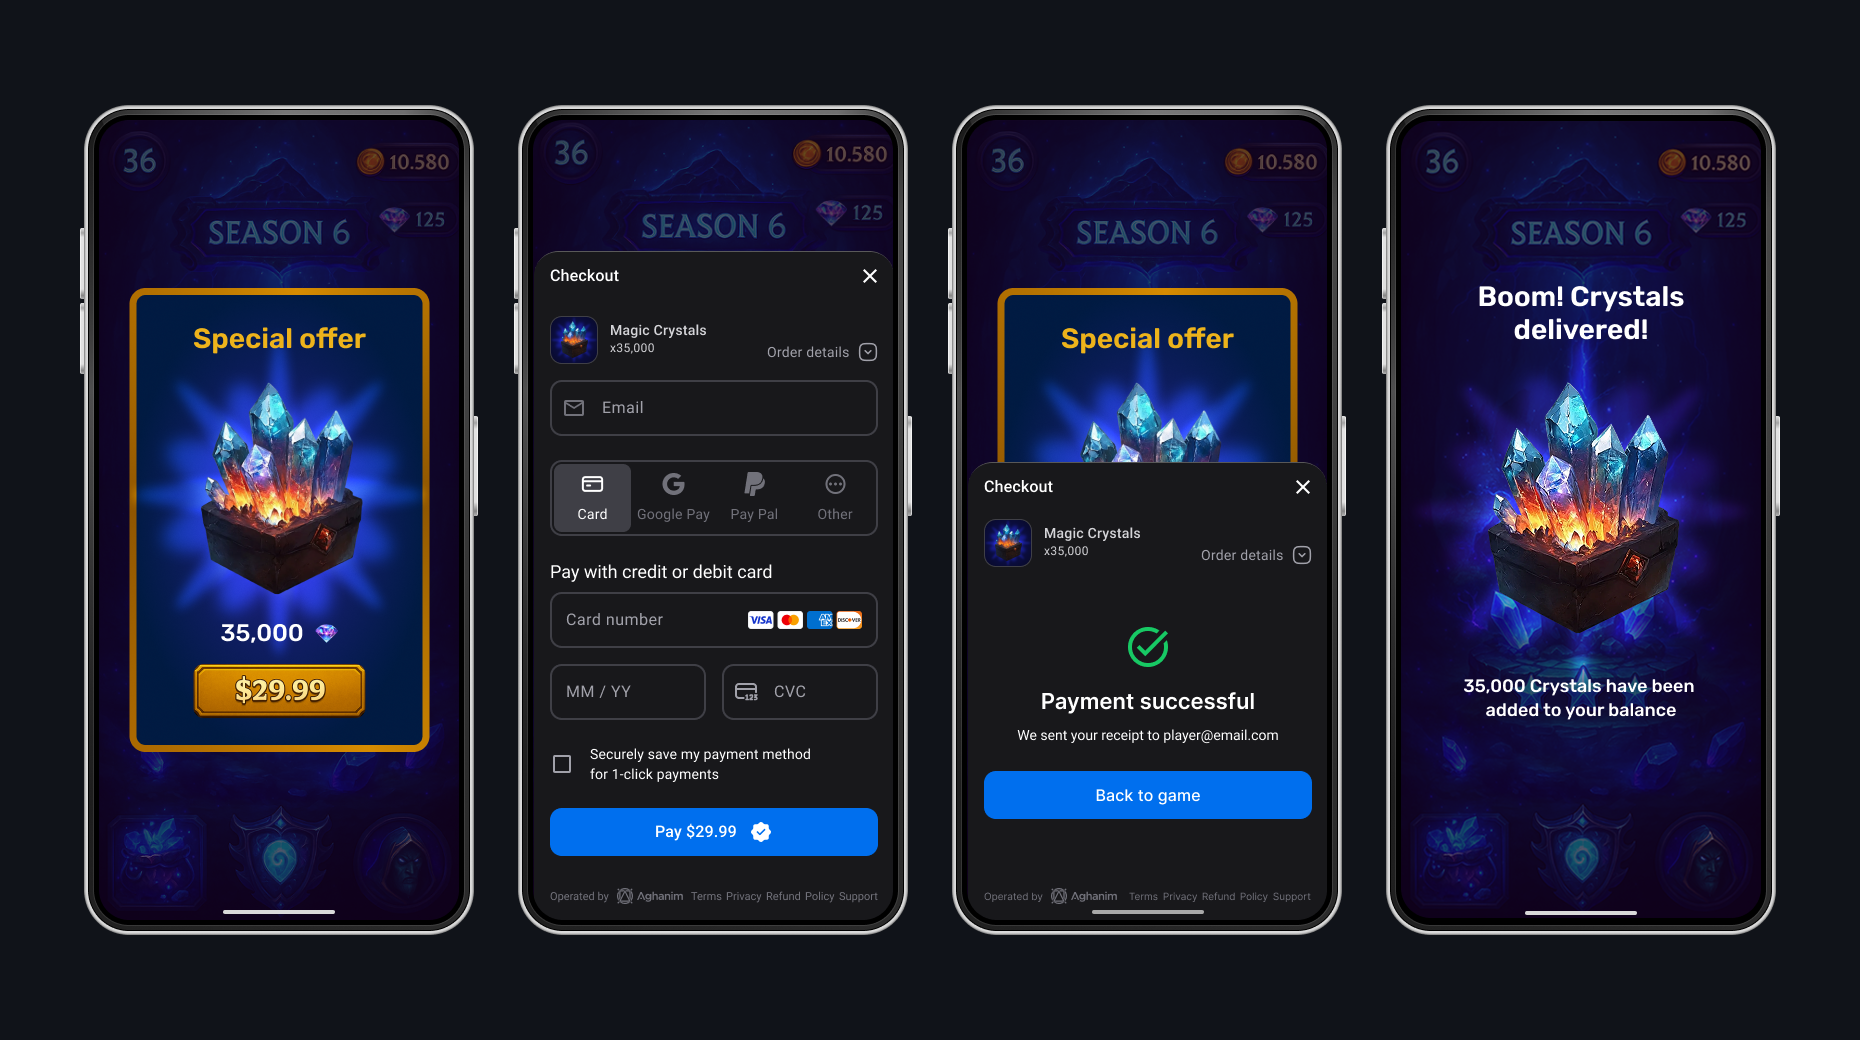
The SDK forces dark mode appearance for the Checkout UI.
- C#
var uiSettings = new UiSettings(
    mode: UiMode.Dark
);

var checkoutParams = new CheckoutParams(
    items: items,
    uiSettings: uiSettings
);
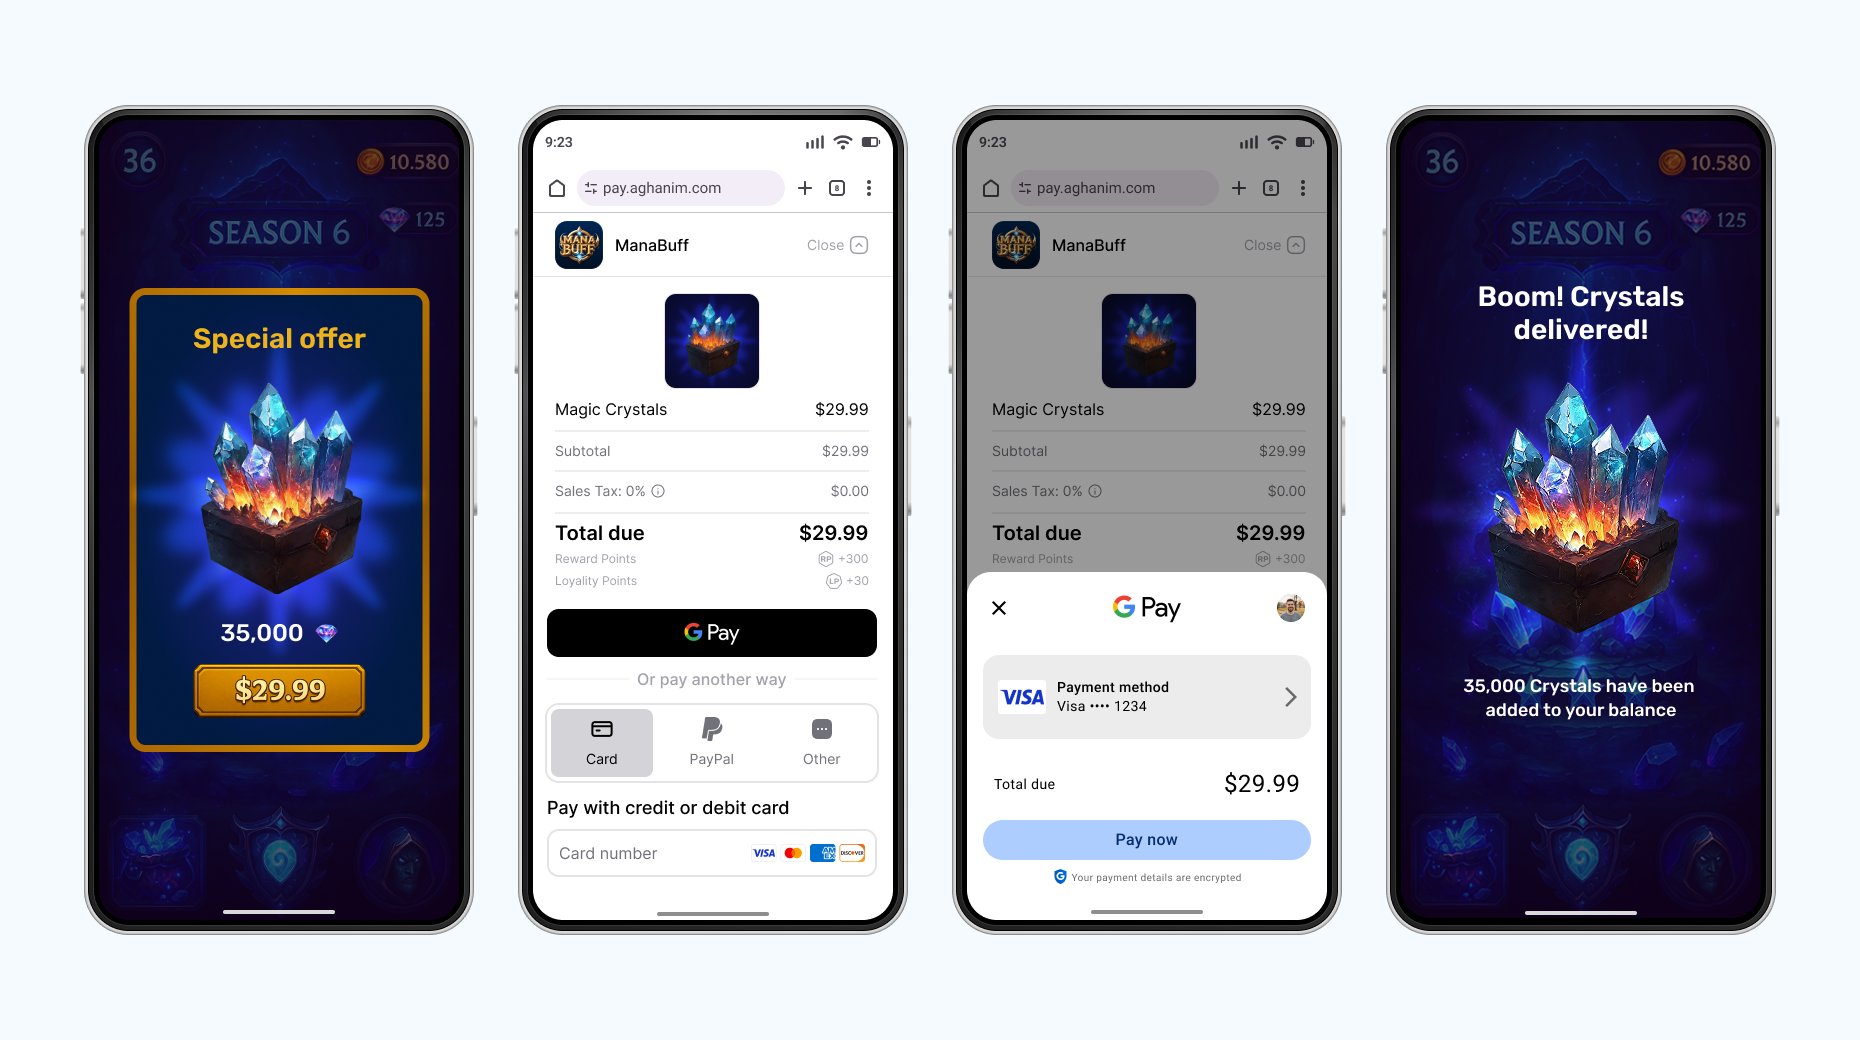
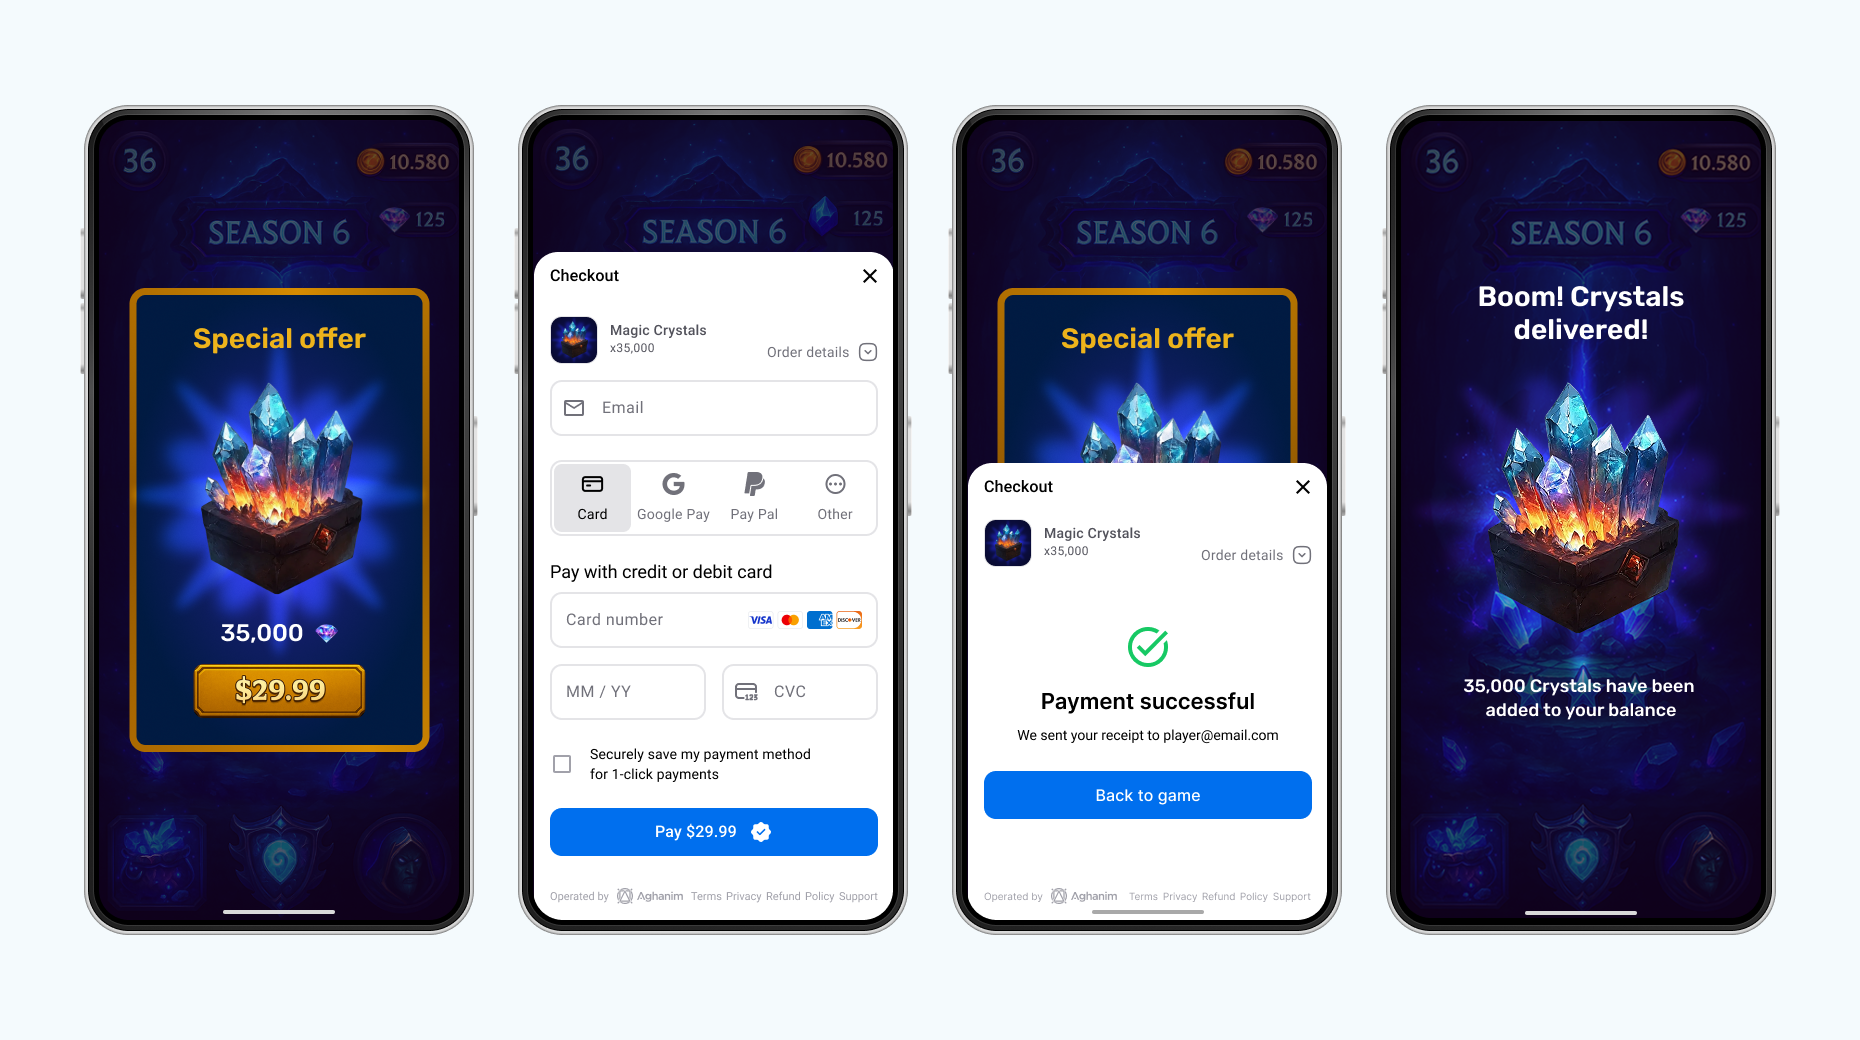
The SDK forces light mode appearance for the Checkout UI.
- C#
var uiSettings = new UiSettings(
    mode: UiMode.Light
);

var checkoutParams = new CheckoutParams(
    items: items,
    uiSettings: uiSettings
);
Launch Checkout
Add a checkout button to your game client that launches the payment form. The SDK creates an order from the provided checkout params and opens the Checkout UI. On success, you receive the Order ID to track the order. On failure, you receive an error with debug information for troubleshooting.
- Default browser
- In-app browser
- Custom per platform
For Android and iOS, the Default browser launch mode works in the player default browser. Use the mode when you want to redirect the player outside your app.
- C#
Aghanim.StartCheckout(
    checkoutParams,
    LaunchMode.DefaultBrowser,
    onSuccess: (orderId) =>
    {
        // Order is created and checkout has launched successfully
        // TODO: Save order ID for further granting or tracking
    },
    onError: (error) =>
    {
        // Log debug information for troubleshooting
        Debug.LogError($"Failed to launch Checkout: {error}");
        // TODO: Show user-friendly error message to player
    }
);
For Android and iOS, the In-app browser launch mode creates the seamless players’ experience via Android Custom Tabs and iOS SFSafariViewController.
- C#
Aghanim.StartCheckout(
    checkoutParams,
    LaunchMode.InternalBrowser,
    onSuccess: (orderId) =>
    {
        // Order is created and checkout has launched successfully
        // TODO: Save order ID for further granting or tracking
    },
    onError: (error) =>
    {
        // Log debug information for troubleshooting
        Debug.LogError($"Failed to launch Checkout: {error}");
        // TODO: Show user-friendly error message to player
    }
);
You can use different launch modes for each platform.
- C#
var launchMode = new LaunchMode(
    android: AndroidLaunchMode.NativeUI(),
    ios: IOSLaunchMode.InAppBrowser()
);

Aghanim.StartCheckout(
    checkoutParams,
    launchMode,
    onSuccess: (orderId) =>
    {
        // Order is created and checkout has launched successfully
        // TODO: Save order ID for further granting or tracking
    },
    onError: (error) =>
    {
        // Log debug information for troubleshooting
        Debug.LogError($"Failed to launch Checkout: {error}");
        // TODO: Show user-friendly error message to player
    }
);
On iOS, IOSLaunchMode.InAppBrowser() accepts an optional onViewClosed callback. It is invoked when the player closes the SFSafariViewController. You can use it to check the order status and grant items when the player returns to the game.
- C#
var launchMode = new LaunchMode(
    android: AndroidLaunchMode.InAppBrowser(),
    ios: IOSLaunchMode.InAppBrowser(
        onViewClosed: (e) =>
        {
            // The player closed the in-app browser
            // You can check order status and grant items if needed
        }
    )
);
Make payment
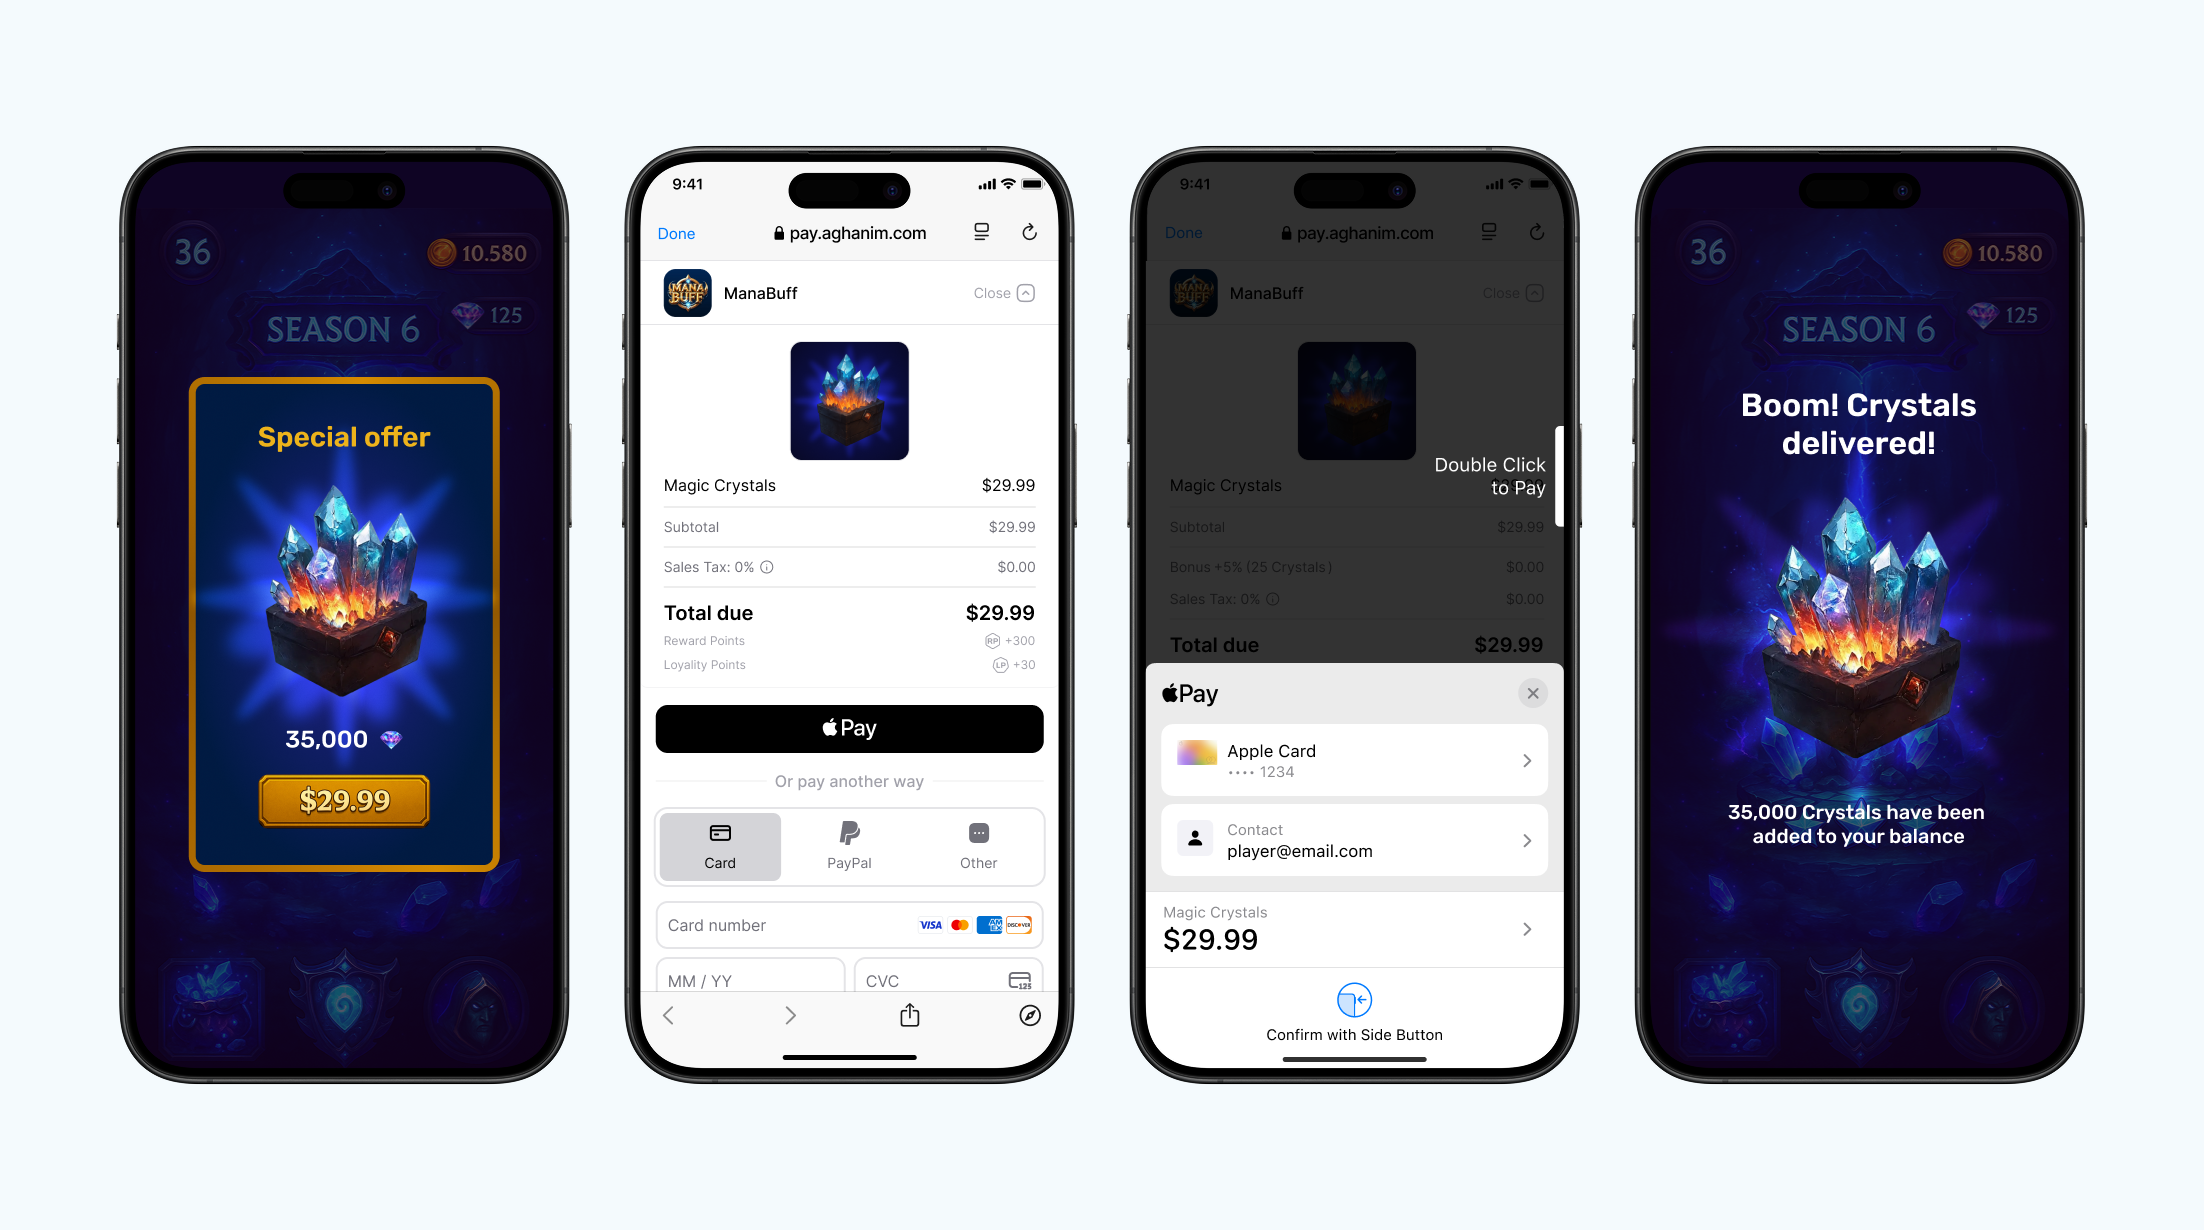
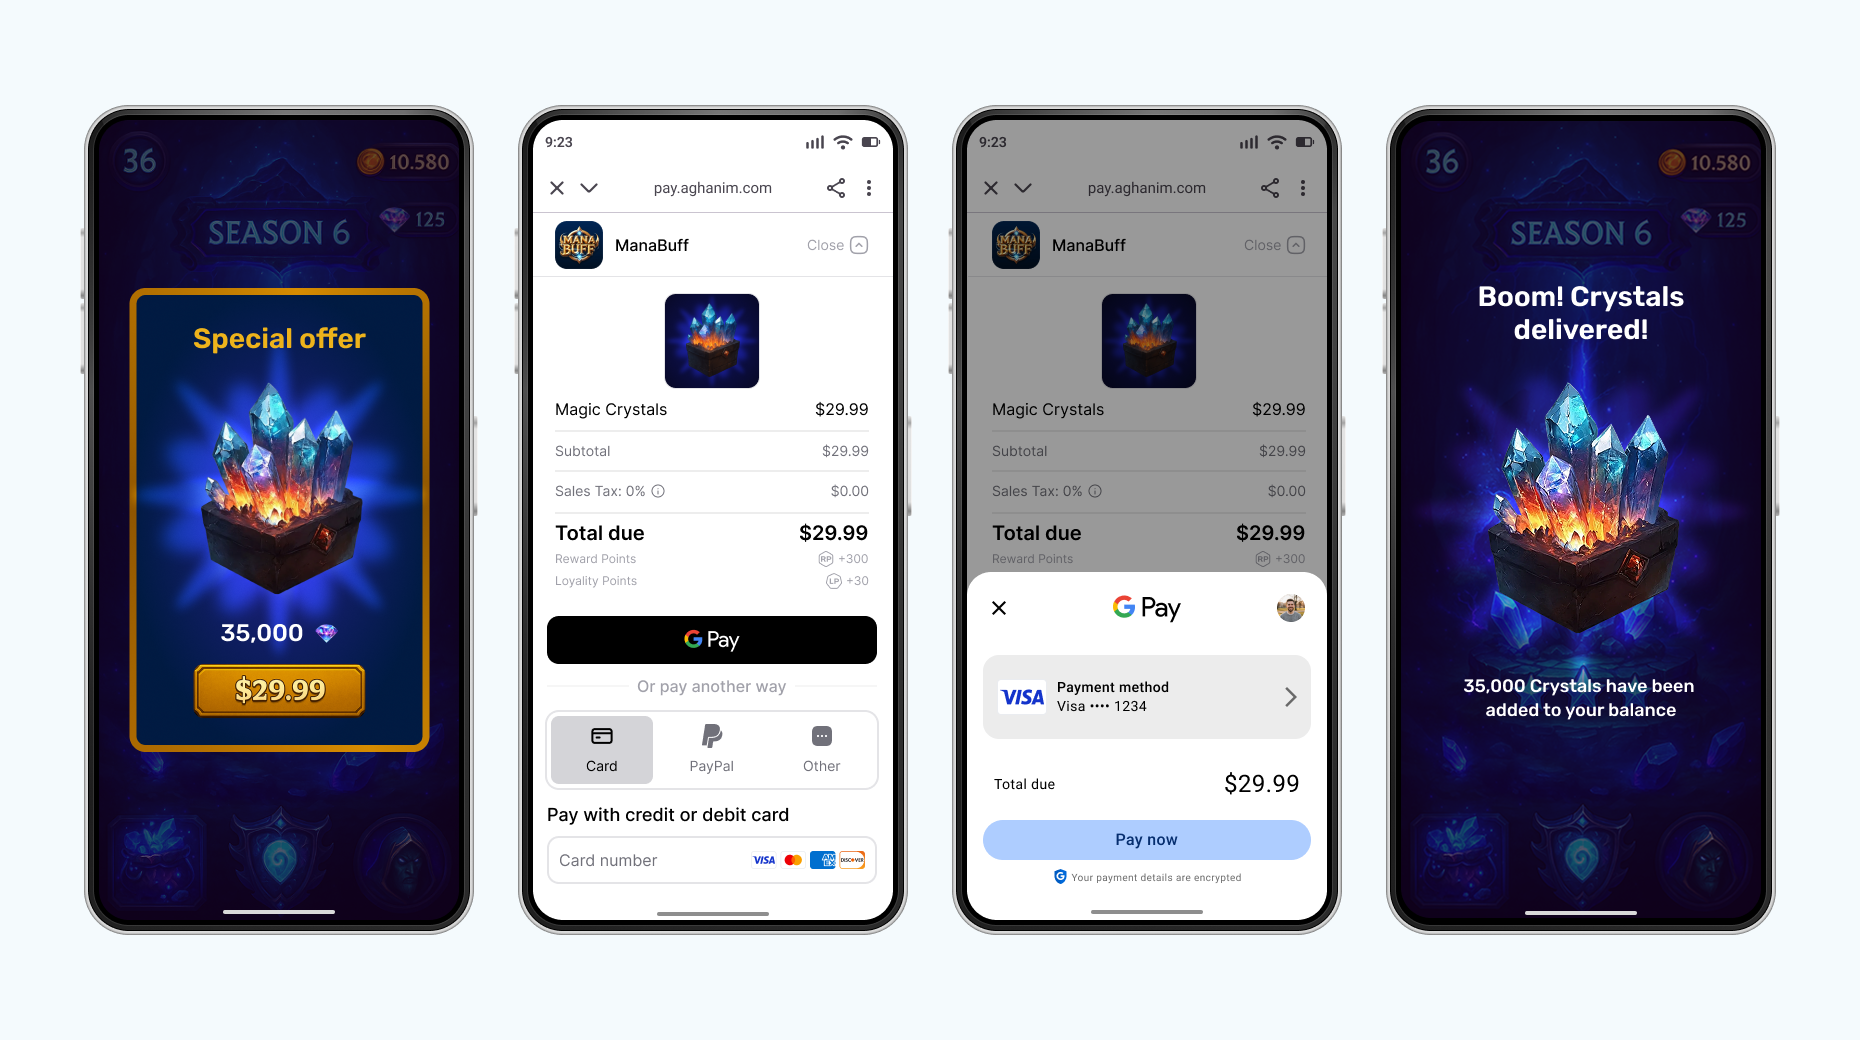
Make a payment. If you have set the sandbox mode, use the test card below. In the sandbox, you can make payments only with the test cards — alternative methods like PayPal, wallets, and local payment methods appear only in the live environment. The test cards accept any digits as CVV and any future date as expiry date. Don’t forget to fill in an email address to check the receipt is sent and any postal code as a billing address.
Successful payments
After you complete the payment, you will receive a receipt sent to the specified email address and a transaction record in Aghanim Dashboard → Transactions.
| Card Brand | Card Number | CVV | Expiry date | Country |
|---|---|---|---|---|
| VISA (credit) | 4242 4242 4242 4242 | Any 3 digits | Any future date | GB |
Unsuccessful payments
Make unsuccessful payment just in case you are curious. You will see the transaction in Aghanim Dashboard → Transactions as well.
| Number | CVV | Expiry date | Response code | Description |
|---|---|---|---|---|
4832 2850 6160 9015 | Any 3 digits | Any future date | 16 | Payment declined |
For the live mode, you can find all supported payment methods in Company settings → Payment methods. Turn on or off those you see suitable. Some payment methods are available globally by default. You can’t disable Credit cards, Apple Pay, Google Pay, and PayPal.
In Checkout, the Aghanim evaluates the currency and any restrictions, then dynamically presents only the payment methods available to the player based on evaluation.
When you use the live mode, the payment form shows to the player a setting to save their payment method so they can make a one-click payment in the future.
Handle post-payment events on game server-side
To complete the Checkout, handle items’ granting and chargebacks on your game backend. To do so, implement a webhook system that accepts the item.add and item.remove webhooks. See the code example with the implementation.
Comply with the Aghanim requirements for these webhooks:
- Use HTTPS schema for the single POST webhook endpoint.
- Check that webhooks are generated and signed by the Aghanim.
- Handle the
idempotency_keyfield in the webhook payload to prevent processing duplicate webhooks. - Respond with the HTTP status codes:
2xxfor successfully processed webhooks.4xxand5xxfor errors.
Grant items to player
The Aghanim sends the item.add webhook to let you know about the purchased items and ask for your permission to grant them to the player.
When the Aghanim has your 2xx answer, it can complete the checkout logic and redirect the player to a deep link if provided.
Support refunds and chargebacks
The Aghanim sends the item.remove webhook when a bank or payment system reverses the transaction, or you have requested refund in Aghanim Dashboard → Transactions. Partial refunds are not supported.
The suggested implementation handles the webhooks mentioned before:
item.addfor granting items. You need it for integration.item.removefor refunds and chargebacks. You might need it for integration.
- Python
- Ruby
- Node.js
- Go
# 使用以下示例代码来处理您集成环境中的 Webhook 事件。
#
# 1. 将此代码复制到新创建的 `server.py` 文件中。
#
# 2. 安装必要的依赖项:
#    python -m pip install fastapi[all]
#
# 3. 在 http://localhost:8000 地址上运行服务器
#    python server.py

import fastapi, hashlib, hmac, json, typing
from fastapi.responses import JSONResponse

app = fastapi.FastAPI()

@app.post("/webhook")
async def webhook(request: fastapi.Request) -> dict[str, typing.Any]:
    secret_key = "<YOUR_S2S_KEY>"  # 请替换为您的实际 Webhook Secret Key

    raw_payload = await request.body()
    payload = raw_payload.decode()
    timestamp = request.headers["x-aghanim-signature-timestamp"]
    received_signature = request.headers["x-aghanim-signature"]

    if not verify_signature(secret_key, payload, timestamp, received_signature):
        raise fastapi.HTTPException(status_code=403, detail="Invalid signature")

    data = json.loads(payload)
    event_type = data["event_type"]
    event_data = data["event_data"]

    if event_type == "item.add":
        add_item(event_data)
        return {"status": "ok"}

    if event_type == "item.remove":
        remove_item(event_data)
        return {"status": "ok"}

    raise fastapi.HTTPException(status_code=400, detail="Unknown event type")

def verify_signature(secret_key: str, payload: str, timestamp: str, received_signature: str) -> bool:
    signature_data = f"{timestamp}.{payload}"
    computed_hash = hmac.new(secret_key.encode(), signature_data.encode(), hashlib.sha256)
    computed_signature = computed_hash.hexdigest()
    return hmac.compare_digest(computed_signature, received_signature)

def add_item(event_data: dict[str, typing.Any]) -> None:
    # 用于处理事件和添加商品的示例占位代码。
    # 在实际应用中,此函数将与您的数据库或库存管理系统进行交互。
    player_id = event_data["player_id"]
    for item in event_data["items"]:
      sku = item["sku"]
      print(f"Item {sku} has been credited to player's {player_id} account.")

def remove_item(event_data: dict[str, typing.Any]) -> None:
    # 用于处理事件和移除商品的示例占位代码。
    # 在实际应用中,此函数将与您的数据库或库存管理系统进行交互。
    player_id = event_data["player_id"]
    for item in event_data["items"]:
      sku = item["sku"]
      print(f"Item {sku} has been removed from player's {player_id} account.")

if __name__ == "__main__":
    import uvicorn
    uvicorn.run(app, host="0.0.0.0", port=8000)
# 使用以下示例代码来处理您集成环境中的 Webhook 事件。
#
# 1. 将此代码复制到新创建的 `server.rb` 文件中。
#
# 2. 安装必要的依赖项:
# gem install sinatra json hmac
#
# 3. 在 http://localhost:8000 地址上运行服务器
# ruby server.rb
require 'sinatra'
require 'json'
require 'openssl'
post '/webhook' do
secret_key = "<YOUR_S2S_KEY>" # 请替换为您的实际 Webhook Secret Key
payload = request.body.read
timestamp = request.env["HTTP_X_AGHANIM_SIGNATURE_TIMESTAMP"]
received_signature = request.env["HTTP_X_AGHANIM_SIGNATURE"]
unless verify_signature(secret_key, payload, timestamp, received_signature)
halt 403, "Invalid signature"
end
data = JSON.parse(payload)
event_type = data["event_type"]
event_data = data["event_data"]
if event_type == "item.add"
add_item(event_data)
return { status: "ok" }.to_json
end
if event_type == "item.remove"
remove_item(event_data)
return { status: "ok" }.to_json
end
halt 400, "Unknown event type"
end
def verify_signature(secret_key, payload, timestamp, received_signature)
signature_data = "#{timestamp}.#{payload}"
computed_signature = OpenSSL::HMAC.hexdigest('sha256', secret_key, signature_data)
OpenSSL.secure_compare(computed_signature, received_signature)
end
def add_item(event_data)
# 用于处理事件和添加商品的示例��占位代码。
# 在实际应用中,此函数将与您的数据库或库存管理系统进行交互。
player_id = event_data["player_id"]
for item in event_data["items"] do
sku = item["sku"]
puts "Item #{sku} has been credited to player's #{player_id} account."
end
end
def remove_item(event_data)
# 用于处理事件和移除商品的示例占位代码。
# 在实际应用中,此函数将与您的数据库或库存管理系统进行交互。
player_id = event_data["player_id"]
for item in event_data["items"] do
sku = item["sku"]
puts "Item #{sku} has been removed from player's #{player_id} account."
end
end
if __FILE__ == $0
require 'sinatra'
set :bind, '0.0.0.0'
set :port, 8000
end
// 使用以下示例代码来处理您集成环境中的 Webhook 事件。
//
// 1. 将此代码复制到新创建的 `server.js` 文件中。
//
// 2. 安装必要的依赖项:
//    npm install express
//
// 3. 在 http://localhost:8000 地址上运行服务器
//    node server.js

const express = require('express');
const crypto = require('crypto');

const app = express();

app.post('/webhook', express.raw({ type: "*/*" }), async (req, res) => {
  const secretKey = '<YOUR_S2S_KEY>'; // 请替换为您的实际 Webhook Secret Key

  const rawPayload = req.body;
  const timestamp = req.headers['x-aghanim-signature-timestamp'];
  const receivedSignature = req.headers['x-aghanim-signature'];

  if (!verifySignature(secretKey, rawPayload, timestamp, receivedSignature)) {
    return res.status(403).send('Invalid signature');
  }

  const payload = JSON.parse(req.body);
  const { event_type, event_data } = payload;

  if (event_type === 'item.add') {
    addItem(event_data);
    return res.json({ status: 'ok' });
  }

  if (event_type === 'item.remove') {
    removeItem(event_data);
    return res.json({ status: 'ok' });
  }

  return res.status(400).send('Unknown event type');
});

function verifySignature(secretKey, payload, timestamp, receivedSignature) {
  const signatureData = `${timestamp}.${payload}`;
  const computedSignature = crypto
    .createHmac('sha256', secretKey)
    .update(signatureData)
    .digest('hex');
  return crypto.timingSafeEqual(Buffer.from(computedSignature), Buffer.from(receivedSignature));
}

function addItem(event_data) {
  // 用于处理事件和添加商品的示例占位代码。
  // 在实际应用中,此函数将与您的数据库或库存管理系统进行交互。
  const playerId = event_data.player_id;
  for (const item of event_data.items) {
    const sku = item.sku;
    console.log(`Item ${item.sku} has been credited to player's ${playerId} account.`);
 }
}

function removeItem(event_data) {
  // 用于处理事件和移除商品的示例占位代码。
  // 在实际应用中,此函数将与您的数据库或库存管理系统进行交互。
  const playerId = event_data.player_id;
  for (const item of event_data.items) {
    const sku = item.sku;
    console.log(`Item ${item.sku} has been removed from player's ${playerId} account.`);
 }
}

app.listen(8000, () => {
  console.log('Server is running on http://localhost:8000');
});
// 使用以下示例代码来处理您集成环境中的 Webhook 事件。
//
// 1. 将此代码复制到新创建的 `server.go` 文件中。
//
// 2. 在 http://localhost:8000 地址上运行服务器
// go run server.go
package main
import (
"crypto/hmac"
"crypto/sha256"
"encoding/hex"
"encoding/json"
"fmt"
"io/ioutil"
"net/http"
)
func webhookHandler(w http.ResponseWriter, r *http.Request) {
secretKey := "<YOUR_S2S_KEY>" // 请替换为您的实际 Webhook Secret Key
rawPayload, _ := ioutil.ReadAll(r.Body)
payload := string(rawPayload)
timestamp := r.Header.Get("X-Aghanim-Signature-Timestamp")
receivedSignature := r.Header.Get("X-Aghanim-Signature")
if !verifySignature(secretKey, payload, timestamp, receivedSignature) {
http.Error(w, "Invalid signature", http.StatusForbidden)
return
}
var data map[string]interface{}
if err := json.Unmarshal(rawPayload, &data); err != nil {
http.Error(w, "Invalid payload", http.StatusBadRequest)
return
}
eventType := data["event_type"].(string)
eventData := data["event_data"].(map[string]interface{})
if eventType == "item.add" {
addItem(eventData)
w.WriteHeader(http.StatusOK)
json.NewEncoder(w).Encode(map[string]string{"status": "ok"})
return
}
if eventType == "item.remove" {
removeItem(eventData)
w.WriteHeader(http.StatusOK)
json.NewEncoder(w).Encode(map[string]string{"status": "ok"})
return
}
http.Error(w, "Unknown event type", http.StatusBadRequest)
}
func verifySignature(secretKey, payload, timestamp, receivedSignature string) bool {
signatureData := fmt.Sprintf("%s.%s", timestamp, payload)
mac := hmac.New(sha256.New, []byte(secretKey))
mac.Write([]byte(signatureData))
computedSignature := hex.EncodeToString(mac.Sum(nil))
return hmac.Equal([]byte(computedSignature), []byte(receivedSignature))
}
func addItem(eventData map[string]interface{}) {
// 用�于处理事件和添加商品的示例占位代码。
// 在实际应用中,此函数将与您的数据库或库存管理系统进行交互。
playerID := eventData["player_id"].(string)
items := eventData["items"].([]interface{})
for _, item := range items {
itemMap := item.(map[string]interface{})
sku := itemMap["sku"].(string)
fmt.Printf("Item %s has been credited to player's %s account.\\n", sku, playerID)
}
}
func removeItem(eventData map[string]interface{}) {
// 用于处理事件和移除商品的示例占位代码。
// 在实际应用中,此函数将与您的数据库或库存管理系统进行交互。
playerID := eventData["player_id"].(string)
items := eventData["items"].([]interface{})
for _, item := range items {
itemMap := item.(map[string]interface{})
sku := itemMap["sku"].(string)
fmt.Printf("Item %s has been removed from player's %s account.\\n", sku, playerID)
}
}
func main() {
http.HandleFunc("/webhook", webhookHandler)
fmt.Println("Server is running on http://localhost:8000")
http.ListenAndServe(":8000", nil)
}
Add webhook endpoint to Aghanim
When the webhook handling is ready, add the endpoint to the account so the Aghanim could start sending the events.
- Dashboard
- API
- Go to Integration → Webhooks.
- Click Add webhook. The site will open the Create webhook window.
- Cope and paste the URL
https://<YOUR_DOMAIN>/webhook. - Click Select events. The site will open the Select events to send window.
- Expand the Main class and select the Item add, Item remove checkboxes.
- Click Apply.
- Click Add. The site will redirect you to the webhook page.
- Click Back.
- cURL
- Python
- Ruby
- Node.js
- Go
curl -X POST https://api.aghanim.com/s2s/v1/webhooks \
  -H 'Content-Type: application/json' \
  -H 'Authorization: Bearer <YOUR_S2S_KEY>' \
  -d '{
    "events": [
      "item.add",
      "item.remove"
    ],
    "url": "https://<YOUR_DOMAIN>/webhook",
    "description": "The endpoint for all webhooks",
    "method": "POST",
    "enabled": true,
    "enabled_logs": true,
    "player_context_enabled": true
  }'
import requests

def create_webhook():
    payload = {
        "events": ["item.add", "item.remove"],
        "url": "https://<YOUR_DOMAIN>/webhook",
        "description": "The endpoint for all webhooks",
        "method": "POST",
        "enabled": True,
        "enabled_logs": True,
        "player_context_enabled": True
    }

    headers = {"Authorization": "Bearer <YOUR_S2S_KEY>", "Content-Type": "application/json"}
    resp = requests.post("https://api.aghanim.com/s2s/v1/webhooks", json=payload, headers=headers)
    return resp.json()
require 'net/http'
require 'json'
require 'uri'

def create_webhook
  uri = URI("https://api.aghanim.com/s2s/v1/webhooks")
  req = Net::HTTP::Post.new(uri, 'Content-Type' => 'application/json', 'Authorization' => 'Bearer <YOUR_S2S_KEY>')
  req.body = {
    events: ["item.add", "item.remove"],
    url: "https://<YOUR_DOMAIN>/webhook",
    description: "The endpoint for all webhooks",
    method: "POST",
    enabled: true,
    enabled_logs: true,
    player_context_enabled: true
  }.to_json

  res = Net::HTTP.start(uri.hostname, uri.port, use_ssl: true) { |http| http.request(req) }
  JSON.parse(res.body)
end
const axios = require('axios');

async function createWebhook() {
  const payload = {
    events: ["item.add", "item.remove"],
    url: "https://<YOUR_DOMAIN>/webhook",
    description: "The endpoint for all webhooks",
    method: "POST",
    enabled: true,
    enabled_logs: true,
    player_context_enabled: true
  };

  const res = await axios.post('https://api.aghanim.com/s2s/v1/webhooks', payload, {
    headers: { 'Authorization': 'Bearer <YOUR_S2S_KEY>', 'Content-Type': 'application/json' }
  });
  return res.data;
}
package main

import (
	"bytes"
	"encoding/json"
	"net/http"
)

func createWebhook() map[string]interface{} {
	payload := map[string]interface{}{
		"events":                 []string{"item.add", "item.remove"},
		"url":                    "https://<YOUR_DOMAIN>/webhook",
		"description":            "The endpoint for all webhooks",
		"method":                 "POST",
		"enabled":                true,
		"enabled_logs":           true,
		"player_context_enabled": true,
	}
	data, _ := json.Marshal(payload)

	req, _ := http.NewRequest("POST", "https://api.aghanim.com/s2s/v1/webhooks", bytes.NewBuffer(data))
	req.Header.Set("Authorization", "Bearer <YOUR_S2S_KEY>")
	req.Header.Set("Content-Type", "application/json")

	client := &http.Client{}
	resp, _ := client.Do(req)
	defer resp.Body.Close()

	var webhook map[string]interface{}
	json.NewDecoder(resp.Body).Decode(&webhook)
	return webhook
}
Test your integration
After you have handled the webhooks, check that the purchased items are in your inventory. That’s all.
Next steps
- See Currency codes and minor units to learn how the Aghanim represents monetary amounts.
- See Payment Webhook to learn about the payment progress when the player visits the payment form.
Troubleshooting
- Make sure the External Dependency Manager is installed.
- Check if all dependencies are resolved in the
CheckoutSdkDependencies.xmlfile.
- Verify that the deep link scheme for your app is properly configured in Android Manifest.
- Check that the deep link handler is set up in Unity build settings.
FAQ
Android. Default browser
Register with Aghanim and link your game
First, register for an Aghanim account. At the end of registration, add the link to your mobile game. It should be published in Apple App Store or Google Play Store.
Set up environment
If you want to make real payments, you are all set as the live mode is used as default. Otherwise, use a sandbox, an isolated test environment, to simulate the Aghanim events to test payments without real money movement. To turn on the sandbox mode, set the Sandbox toggle to the active position.
Sandbox supports card payments only. Alternative methods (PayPal, wallets, local payment methods) appear only in live. See Test payments for the test cards.
While integrating, you will need an SDK key to authenticate requests to the Aghanim. Keep in mind that the sandbox and live modes have different keys. Find the SDK key in Integration → API keys.
Configure game client-side
Configure your game client to work with the Checkout by setting up the SDK and implementing the necessary code to process its methods.
Add SDK scoped registries
Additionally to the Aghanim resources, the SDK uses EDM (External Dependency Manager) for Unity to update and resolve Android (Gradle and Maven) и iOS (CocoaPods) dependencies. Add the registries to Unity settings so it will know where to find their dependencies.
In the Unity Editor:
- Select Edit → Project Settings.
- Go to Package Manager.
- Expand the Scoped Registries pane.
- Add the Aghanim registry:
- In the pane for a scoped registry name, click +.
- Copy and paste the registry details:
- For the Name filed, use Aghanim Registry.
- For the URL filed, use https://us-central1-npm.pkg.dev/ag-registry/aghanim.
- For the Scopes filed, use com.aghanim.
- Click Save.
- Add the EDM registry:
- In the pane for a scoped registry name, click +.
- Copy and paste the registry details:
- For the Name filed, use package.openupm.com.
- For the URL filed, use https://package.openupm.com.
- For the Scopes filed, use com.google.external-dependency-manager.
- Click Save.
Set Android Minimum API Level
To comply with the SDK software requirements, set Android Minimum API Level 24.
In the Unity Editor:
- Select Edit → Project Settings.
- Go to Player.
- Click the Android settings tab.
- Expand the Other Settings pane.
- Scroll to the Identification group.
- In the Minimum API Level field, select API level 24.
Enable Custom Gradle templates
On Android, Unity handles the project builds by Gradle. To give the SDK full access to Gradle builds, enable some templates to customize the Gradle configuration.
In the Unity Editor:
- Select Edit → Project Settings.
- Go to Player.
- Click the Android settings tab.
- Expand the Publishing settings pane.
- Scroll to the Build group.
- Select the checkboxes:
- Custom Main Gradle Template.
- Custom Base Gradle Template.
- Custom Gradle Properties Template.
Change minimum Gradle and AGP versions
Since Unity of 2022.3.62f2–6000.0.60f1 versions preinstalls earlier versions of Gradle and AGP, you need to change them manually.
First, check what AGP version your Unity uses. In the Unity Editor:
- Go to Project tab.
- Expand the Assets → Plugins → Android folders.
- Open the
baseProjectTemplate.gradlefile. - If the file has AGP 8.10.0, you are set and can skip further steps of this section. If not, copy this file content and paste it to the file of your project and follow the steps below.
- Gradle
plugins {
    // If you are changing the Android Gradle Plugin version, make sure it is compatible with the Gradle version preinstalled with Unity
    // See which Gradle version is preinstalled with Unity here https://docs.unity3d.com/Manual/android-gradle-overview.html
    // See official Gradle and Android Gradle Plugin compatibility table here https://developer.android.com/studio/releases/gradle-plugin#updating-gradle
    // To specify a custom Gradle version in Unity, go do "Preferences > External Tools", uncheck "Gradle Installed with Unity (recommended)" and specify a path to a custom Gradle version
    id 'com.android.application' version '8.10.0' apply false
    id 'com.android.library' version '8.10.0' apply false
    **BUILD_SCRIPT_DEPS**
}

task clean(type: Delete) {
    delete rootProject.buildDir
} - Save and close the file.
Now, download and place Gradle of the new version:
- Download Gradle 8.11.1.
- Unpack the downloaded file.
- Place the Gradle folder near other programs or applications in your file system.
- In the terminal, get the Gradle version.
/<YOUR_FILE_SYSTEM_PATH>gradle-8.11.1/bin/gradle -v - Check whether the output has the
Gradle 8.11.1line. If yes, Gradle is ready to use.
After Gradle is functioning, let Unity know it should use a custom Gradle version. In the Unity Editor:
- Select Unity → Settings.
- Go to External Tools.
- In the Android group, clear the Gradle Installed with Unity (recommended) checkbox.
- Click Browse.
- In the folder picker, find and select the new Gradle version.
- Close the Preferences window.
Install SDK
Additionally to the Aghanim resources, the SDK uses EDM (External Dependency Manager) for Unity to update and resolve Android (Gradle and Maven) и iOS (CocoaPods) dependencies. Add the registries to Unity settings so it will know where to find their dependencies.
In the Unity Editor:
- Select Window → Package Manager.
- In the window, select + → Add package by name.
- Copy and paste the SDK details:
- For the Name filed, use com.aghanim.sdk.
- For the Version field, use 1.13.2.
- Click Add.
- Wait for the Aghanim SDK and EDM to be installed.
- Close the window.
For Android, to verify that the SDK is installed in the Unity Editor:
- Select Assets → External Dependency Manager → Android Resolver → Force Resolve.
- Get the Android Dependencies window with the Resolution Succeeded message.
- Close the window.
Configure EDM
To let EDM declare dependencies in the mainTemplate.gradle file rather than download dependency artifacts into the Unity project, configure EDM in the Unity Editor:
- Select Assets → External Dependency Manager → Android Resolver → Settings.
- In the window:
- Clear the Enable Auto-Resolution checkbox.
- Select the Patch mainTemplate.gradle checkbox.
- Click OK.
Initialize SDK
To use the SDK, initialize it once in the lifetime of the game process:
- Copy the SDK key from Integration → API keys.
- Create
AghanimConfigwith the SDK key and pass it toAghanim.Initialize:
- C#
using Aghanim;

private void Awake()
{
    var config = new AghanimConfig("YOUR_SDK_API_KEY");
    Aghanim.Initialize(config);
}
With the SDK, you can read its logs from one of the supported levels. The SDK writes all log messages into Android logcat, iOS Xcode console, and Unity Editor → Unity Console, the default tools for logging.
- Simple
- Advanced
The simple usage of the SDK log messages means setting the log level you are interested in the most:
DEBUG— detailed debug information on almost every event.INFO— general information on the SDK instance state and its events.WARNING— warnings and recoverable errors.ERROR— critical and fatal errors.NONE— no logging. Used by default.
- C#
using Aghanim;

private void Awake()
{
    var config = new AghanimConfig("YOUR_SDK_API_KEY")
    {
        MinLogLevel = AghanimLogLevel.DEBUG
    };
    Aghanim.Initialize(config);
}
You can reroute the SDK logs from the default tools to the system you have chosen for logging. The SDK supports these log levels:
DEBUG— detailed debug information on almost every event.INFO— general information on the SDK instance state and its events.WARNING— warnings and recoverable errors.ERROR— critical and fatal errors.NONE— no logging. Used by default.
First, provide a custom logger implementation for the SDK interface.
- C#
using Aghanim;

public class MyLogger : IAghanimLogger
{
    public void LogDebug(string message, Exception exception = null)
    {
        // TODO: Send debug messages to your logging system
    }

    public void LogInfo(string message, Exception exception = null)
    {
        // TODO: Send information messages to your logging system
    }

    public void LogWarning(string message, Exception exception = null)
    {
        // TODO: Send warning messages to your logging system
    }

    public void LogError(string message, Exception exception = null)
    {
        // TODO: Send error messages to your logging system
    }
}
After, use the implementation in the SDK initialization.
- C#
using Aghanim;

private void Awake()
{
    var config = new AghanimConfig("YOUR_SDK_API_KEY")
    {
        MinLogLevel = AghanimLogLevel.DEBUG,
        Logger = new MyLogger()
    };
    Aghanim.Initialize(config);
}
Configure player ID
Since a mobile game has one instance per device, the SDK allows to set the player ID once to use it in all following method calls.
When your game client has the player ID, set it for the current SDK instance.
- C#
Aghanim.SetPlayerId(playerId);
Create item
The integration needs the items to be added to the Dashboard. When creating items, each should have its SKU, a unique identifier for the item within your game backend. You can add their prices, currency, sale configuration, and more.
To add an item to the Dashboard:
- Go to SKU Management → Items.
- Click Add Item. The site will open the Add Item page.
- Enter the item name New item.
- Enter the item SKU items.new.ba68a028-2d51-46b4-a854-68fc16af328a.
- In the Price block:
- Select the Fiat price type for a real money item.
- Enter the price 1.99.
- Click Add item.
For integration purposes, we have shortened an item setup. Before going live, use every suitable feature while adding items to the Dashboard.
Get items with localized prices
The SDK retrieves items created in the Dashboard with localized prices based on the player's region. Use this to display accurate prices in your in-game store before the player proceeds to checkout.
- C#
Aghanim.GetItems(
    skus: new List<string> { "items.new.ba68a028-2d51-46b4-a854-68fc16af328a" },
    onSuccess: (items) =>
    {
        foreach (var item in items)
        {
            // Use item.Name, item.Price.Display, item.ImageUrl to populate your store
            Debug.Log($"{item.Name}: {item.Price.Display}");
        }
    },
    onError: (error) =>
    {
        // Log debug information for troubleshooting
        Debug.LogError($"Failed to get items: {error}");
        // TODO: Handle error
    }
);
Create Checkout item
It is time to create a variable that represents the items to be purchased.
- C#
var items = new List<CheckoutItem>
{
    new CheckoutItem("items.new.ba68a028-2d51-46b4-a854-68fc16af328a")
};
Configure deep links
As the SDK launches the Checkout in the browser, the player needs to be back to your app once they complete the payment. To return the player to, the SDK needs you to specify deep links for the app.
- App & Universal Links
- Custom Schemes
With Android App Links and iOS Universal Links, the player goes directly to the app without any additional clicks. Links use standard HTTPS URLs and the operating system verifies their domain. It makes this approach secure and more suitable for the production environment. We recommend to use it for better players’ experience.
Let’s configure App Links first. Create a variable for the deep link URL. We will use it later.
- C#
string backToGameUrl = "https://<YOUR_DOMAIN>/checkout-complete";
The Android SDK can trust the deep links and their domain only when the domain is hosted on a server. The server should have the assetlinks.json file containing this domain information. Host the file at https://<YOUR_DOMAIN>/.well-known/assetlinks.json. The file acts as a bridge to verify the authenticity of the links’ domain and your app by the Android SDK.
- assetlinks.json
[{
  "relation": ["delegate_permission/common.handle_all_urls"],
  "target": {
    "namespace": "android_app",
    "package_name": "com.<YOUR_COMPANY>.<YOUR_APP>",
    "sha256_cert_fingerprints": ["<YOUR_APP_FINGERPRINT>"]
  }
}]
The Android SDK needs to know that the deep links lead to your app. To create this connection, add an intent filter in the manifest.
- AndroidManifest.xml
<activity android:name=".MainActivity">
    <intent-filter android:autoVerify="true">
       <action android:name="android.intent.action.VIEW" />
       <category android:name="android.intent.category.DEFAULT" />
       <category android:name="android.intent.category.BROWSABLE" />

        <!-- URL parts from backToGameUrl -->
       <data
           android:scheme="https"
           android:host="<YOUR_DOMAIN>"
           android:pathPrefix="/checkout"
       />
    </intent-filter>
</activity>
Since Unity has the intent filter configuration, no need to handle the deep link in the Activity.
Now, it is Universal Links turn. After building the Xcode project from Unity, open it in Xcode to add the Associated Domains capability:
- Select your app target in the project editor.
- Go to the Signing & Capabilities tab.
- Click + Capability and select Associated Domains.
- Click the Add (+) button at the bottom of the Domains table and add
applinks:<YOUR_DOMAIN>. Include only the desired subdomain and the top-level domain. Don't include path and query components or a trailing slash.
To avoid repeating this on every rebuild, you can automate it with a PostProcessBuild script using ProjectCapabilityManager.AddAssociatedDomains():
- C#
using UnityEditor;
using UnityEditor.Callbacks;
using UnityEditor.iOS.Xcode;

public class Sample_AddAssociatedDomains
{
    [PostProcessBuild]
    public static void OnPostprocessBuild(BuildTarget buildTarget, string pathToBuiltProject)
    {
        // Stop processing if build target isn't iOS

        if (buildTarget != BuildTarget.iOS)
            return;

        // Initialize PBXProject
        var projectPath = PBXProject.GetPBXProjectPath(pathToBuiltProject);
        PBXProject pbxProject = new PBXProject();
        pbxProject.ReadFromFile(projectPath);

        // Get Main target GUID
        string mainTargetGuid = pbxProject.GetUnityMainTargetGuid();

        // Check if there's already an entitlements file created and use it. If not, create a new file called Example.entitlements
        string entitlementsFile = pbxProject.GetBuildPropertyForAnyConfig(mainTargetGuid, "CODE_SIGN_ENTITLEMENTS");
        if (entitlementsFile == null)
        {
            entitlementsFile = string.Format("Example.entitlements");
        }

        // Initialize ProjectCapabilityManager
        ProjectCapabilityManager capabilityManager = new ProjectCapabilityManager(projectPath, entitlementsFile, targetGuid: mainTargetGuid);

        // Add 'Associated Domains' capability and pass the chosen domains as a string array
        string[] domains = new string[] { "applinks:<YOUR_DOMAIN>" };
        capabilityManager.AddAssociatedDomains(domains);

        // Call WriteToFile to save the changes to project file
        capabilityManager.WriteToFile();
    }

}
iOS also requires domain verification. Create a file named apple-app-site-association (without an extension) and host it at https://<YOUR_DOMAIN>/.well-known/apple-app-site-association. The appIDs value uses the format <Application Identifier Prefix>.<Bundle Identifier> as documented in Supporting Associated Domains.
- apple-app-site-association
{
  "applinks": {
    "details": [
      {
        "appIDs": ["ABCDE12345.com.example.mygame"],
        "components": [
          {
            "/": "/checkout*"
          }
        ]
      }
    ]
  }
}
- You must host the file using HTTPS with a valid certificate and with no redirects.
- If your site uses multiple subdomains, each requires its own entry in the Associated Domains Entitlement, and each must serve its own
apple-app-site-associationfile. - Since iOS 14, apps send requests for the file to an Apple-managed CDN instead of directly to your web server. The CDN requests the file within 24 hours. Devices check for updates approximately once per week after app installation. During development, if your server is unreachable from the public internet, use the alternate mode to bypass the CDN:
applinks:<YOUR_DOMAIN>?mode=developer.
Custom schemes may show a dialog asking the player if they want to open the app. Custom schemes are easier to set up but don’t provide the same security level. It makes this approach suitable for the development and testing environment.
Let’s configure Custom Schemes for Android first. Create a variable for the deep link. We will use it later.
- C#
string backToGameUrl = "myapp://checkout-complete";
The Android SDK needs to know the full deep link and its scheme. Only knowing the scheme, the Android SDK is able to recognize that the deep link leads back to your app and can open it. To create this connection, add an intent filter to the manifest.
- AndroidManifest.xml
<activity android:name=".MainActivity">
    <intent-filter>
        <action android:name="android.intent.action.VIEW" />
        <category android:name="android.intent.category.DEFAULT" />
        <category android:name="android.intent.category.BROWSABLE" />

        <!-- Deep link scheme from backToGameUrl -->
        <data android:scheme="myapp" />
    </intent-filter>
</activity>
Since Unity has the intent filter configuration, no need to handle the deep link in the Activity.
In iOS, Custom Schemes work only when they are registered in the Info.plist file. Add the deep link scheme to the file directly via Xcode:
- In the Info tab, find or add the URL Types section.
- Add a new record and paste
myapp.
Xcode will fill the Info.plist file as presented below.
- Info.plist
<key>CFBundleURLTypes</key>
<array>
    <dict>
        <key>CFBundleURLSchemes</key>
        <array>
            <!-- Deep link scheme from backToGameUrl -->
            <string>myapp</string>
        </array>
    </dict>
</array>
Create Checkout params
When all data variables are ready, create another one that represents Checkout params. Checkout params are the programmatic representation of what the player sees when they are on the payment form. Checkout params are associated with a player and items, they are crucial for the Checkout to work. You can use the existing player from your game or create them at runtime. At this point, you should have the Price template ID.
- C#
var checkoutParams = new CheckoutParams(
    items: items,
    backToGameUrl: backToGameUrl,
    // Optional. Locale for texts’ localization. Default is system locale
    locale: Locale.en
);
You can attach custom metadata to the Checkout for item tracking purposes. You can access it through webhooks and in API responses from the Aghanim. Metadata has a structure of “key-value” pairs.
- C#
var metadata = new Dictionary<string, string>
{
    { "campaign", "winter_sale" },
    { "source", "mobile_app" },
    { "user_segment", "premium" },
    { "ab_test_variant", "variant_a" },
    { "player_level", "42" }
};

var checkoutParams = new CheckoutParams(
    items: items,
    backToGameUrl: backToGameUrl,
    metadata: metadata
);
You can choose the behavior of redirecting the player after they have completed the payment successfully. The difference in the provided by the SDK modes is a delay before redirecting or absence of redirecting.
- Immediate
- Delayed
- No redirect
When the player has completed the payment, the SDK redirects them immediately to the deep link from backToGameUrl.
- C#
using Aghanim.Scripts.Models.Orders;

var redirectSettings = new RedirectSettings(
    mode: RedirectMode.Immediate
);

var checkoutParams = new CheckoutParams(
    items: items,
    backToGameUrl: backToGameUrl,
    redirectSettings: redirectSettings
);
When the player has completed the payment, the SDK shows the screen for the successful payment and then redirects the player to the deep link from backToGameUrl.
- C#
using Aghanim.Scripts.Models.Orders;

var redirectSettings = new RedirectSettings(
    mode: RedirectMode.Delayed,
    // Optional. Seconds to delay for. Default is 5 seconds
    delaySeconds: 5
);

var checkoutParams = new CheckoutParams(
    items: items,
    backToGameUrl: backToGameUrl,
    redirectSettings: redirectSettings
);
When the player has completed the payment, they stay on the screen for the successful payment. To exit it, they manually close it or navigate away. After, you should redirect them to the deep link from backToGameUrl by yourself.
- C#
using Aghanim.Scripts.Models.Orders;

var redirectSettings = new RedirectSettings(
    mode: RedirectMode.NoRedirect
);

var checkoutParams = new CheckoutParams(
    items: items,
    backToGameUrl: backToGameUrl,
    redirectSettings: redirectSettings
);
You can set the appearance mode for the Checkout UI. The SDK supports automatic detection based on the system setting, or you can force a specific mode.
- Auto
- Dark
- Light
The SDK automatically detects and applies the appropriate appearance mode based on the system setting.
- C#
var uiSettings = new UiSettings(
    mode: UiMode.Auto
);

var checkoutParams = new CheckoutParams(
    items: items,
    uiSettings: uiSettings
);
The SDK forces dark mode appearance for the Checkout UI.
- C#
var uiSettings = new UiSettings(
    mode: UiMode.Dark
);

var checkoutParams = new CheckoutParams(
    items: items,
    uiSettings: uiSettings
);
The SDK forces light mode appearance for the Checkout UI.
- C#
var uiSettings = new UiSettings(
    mode: UiMode.Light
);

var checkoutParams = new CheckoutParams(
    items: items,
    uiSettings: uiSettings
);
Launch Checkout
Add a checkout button to your game client that launches the payment form. The SDK creates an order from the provided checkout params and opens the Checkout UI. On success, you receive the Order ID to track the order. On failure, you receive an error with debug information for troubleshooting.
- Default browser
- In-app browser
- Custom per platform
For Android and iOS, the Default browser launch mode works in the player default browser. Use the mode when you want to redirect the player outside your app.
- C#
Aghanim.StartCheckout(
    checkoutParams,
    LaunchMode.DefaultBrowser,
    onSuccess: (orderId) =>
    {
        // Order is created and checkout has launched successfully
        // TODO: Save order ID for further granting or tracking
    },
    onError: (error) =>
    {
        // Log debug information for troubleshooting
        Debug.LogError($"Failed to launch Checkout: {error}");
        // TODO: Show user-friendly error message to player
    }
);
For Android and iOS, the In-app browser launch mode creates the seamless players’ experience via Android Custom Tabs and iOS SFSafariViewController.
- C#
Aghanim.StartCheckout(
    checkoutParams,
    LaunchMode.InternalBrowser,
    onSuccess: (orderId) =>
    {
        // Order is created and checkout has launched successfully
        // TODO: Save order ID for further granting or tracking
    },
    onError: (error) =>
    {
        // Log debug information for troubleshooting
        Debug.LogError($"Failed to launch Checkout: {error}");
        // TODO: Show user-friendly error message to player
    }
);
You can use different launch modes for each platform.
- C#
var launchMode = new LaunchMode(
    android: AndroidLaunchMode.NativeUI(),
    ios: IOSLaunchMode.InAppBrowser()
);

Aghanim.StartCheckout(
    checkoutParams,
    launchMode,
    onSuccess: (orderId) =>
    {
        // Order is created and checkout has launched successfully
        // TODO: Save order ID for further granting or tracking
    },
    onError: (error) =>
    {
        // Log debug information for troubleshooting
        Debug.LogError($"Failed to launch Checkout: {error}");
        // TODO: Show user-friendly error message to player
    }
);
On iOS, IOSLaunchMode.InAppBrowser() accepts an optional onViewClosed callback. It is invoked when the player closes the SFSafariViewController. You can use it to check the order status and grant items when the player returns to the game.
- C#
var launchMode = new LaunchMode(
    android: AndroidLaunchMode.InAppBrowser(),
    ios: IOSLaunchMode.InAppBrowser(
        onViewClosed: (e) =>
        {
            // The player closed the in-app browser
            // You can check order status and grant items if needed
        }
    )
);
Make payment
Make a payment. If you have set the sandbox mode, use the test card below. In the sandbox, you can make payments only with the test cards — alternative methods like PayPal, wallets, and local payment methods appear only in the live environment. The test cards accept any digits as CVV and any future date as expiry date. Don’t forget to fill in an email address to check the receipt is sent and any postal code as a billing address.
Successful payments
After you complete the payment, you will receive a receipt sent to the specified email address and a transaction record in Aghanim Dashboard → Transactions.
| Card Brand | Card Number | CVV | Expiry date | Country |
|---|---|---|---|---|
| VISA (credit) | 4242 4242 4242 4242 | Any 3 digits | Any future date | GB |
Unsuccessful payments
Make unsuccessful payment just in case you are curious. You will see the transaction in Aghanim Dashboard → Transactions as well.
| Number | CVV | Expiry date | Response code | Description |
|---|---|---|---|---|
4832 2850 6160 9015 | Any 3 digits | Any future date | 16 | Payment declined |
For the live mode, you can find all supported payment methods in Company settings → Payment methods. Turn on or off those you see suitable. Some payment methods are available globally by default. You can’t disable Credit cards, Apple Pay, Google Pay, and PayPal.
In Checkout, the Aghanim evaluates the currency and any restrictions, then dynamically presents only the payment methods available to the player based on evaluation.
When you use the live mode, the payment form shows to the player a setting to save their payment method so they can make a one-click payment in the future.
Handle post-payment events on game server-side
To complete the Checkout, handle items’ granting and chargebacks on your game backend. To do so, implement a webhook system that accepts the item.add and item.remove webhooks. See the code example with the implementation.
Comply with the Aghanim requirements for these webhooks:
- Use HTTPS schema for the single POST webhook endpoint.
- Check that webhooks are generated and signed by the Aghanim.
- Handle the
idempotency_keyfield in the webhook payload to prevent processing duplicate webhooks. - Respond with the HTTP status codes:
2xxfor successfully processed webhooks.4xxand5xxfor errors.
Grant items to player
The Aghanim sends the item.add webhook to let you know about the purchased items and ask for your permission to grant them to the player.
When the Aghanim has your 2xx answer, it can complete the checkout logic and redirect the player to a deep link if provided.
Support refunds and chargebacks
The Aghanim sends the item.remove webhook when a bank or payment system reverses the transaction, or you have requested refund in Aghanim Dashboard → Transactions. Partial refunds are not supported.
The suggested implementation handles the webhooks mentioned before:
item.addfor granting items. You need it for integration.item.removefor refunds and chargebacks. You might need it for integration.
- Python
- Ruby
- Node.js
- Go
# 使用以下示例代码来处理您集成环境中的 Webhook 事件。
#
# 1. 将此代码复制到新创建的 `server.py` 文件中。
#
# 2. 安装必要的依赖项:
#    python -m pip install fastapi[all]
#
# 3. 在 http://localhost:8000 地址上运行服务器
#    python server.py

import fastapi, hashlib, hmac, json, typing
from fastapi.responses import JSONResponse

app = fastapi.FastAPI()

@app.post("/webhook")
async def webhook(request: fastapi.Request) -> dict[str, typing.Any]:
    secret_key = "<YOUR_S2S_KEY>"  # 请替换为您的实际 Webhook Secret Key

    raw_payload = await request.body()
    payload = raw_payload.decode()
    timestamp = request.headers["x-aghanim-signature-timestamp"]
    received_signature = request.headers["x-aghanim-signature"]

    if not verify_signature(secret_key, payload, timestamp, received_signature):
        raise fastapi.HTTPException(status_code=403, detail="Invalid signature")

    data = json.loads(payload)
    event_type = data["event_type"]
    event_data = data["event_data"]

    if event_type == "item.add":
        add_item(event_data)
        return {"status": "ok"}

    if event_type == "item.remove":
        remove_item(event_data)
        return {"status": "ok"}

    raise fastapi.HTTPException(status_code=400, detail="Unknown event type")

def verify_signature(secret_key: str, payload: str, timestamp: str, received_signature: str) -> bool:
    signature_data = f"{timestamp}.{payload}"
    computed_hash = hmac.new(secret_key.encode(), signature_data.encode(), hashlib.sha256)
    computed_signature = computed_hash.hexdigest()
    return hmac.compare_digest(computed_signature, received_signature)

def add_item(event_data: dict[str, typing.Any]) -> None:
    # 用于处理事件和添加商品的示例占位代码。
    # 在实际应用中,此函数将与您的数据库或库存管理系统进行交互。
    player_id = event_data["player_id"]
    for item in event_data["items"]:
      sku = item["sku"]
      print(f"Item {sku} has been credited to player's {player_id} account.")

def remove_item(event_data: dict[str, typing.Any]) -> None:
    # 用于处理事件和移除商品的示例占位代码。
    # 在实际应用中,此函数将与您的数据库或库存管理系统进行交互。
    player_id = event_data["player_id"]
    for item in event_data["items"]:
      sku = item["sku"]
      print(f"Item {sku} has been removed from player's {player_id} account.")

if __name__ == "__main__":
    import uvicorn
    uvicorn.run(app, host="0.0.0.0", port=8000)
# 使用以下示例代码来处理您集成环境中的 Webhook 事件。
#
# 1. 将此代码复制到新创建的 `server.rb` 文件中。
#
# 2. 安装必要的依赖项:
# gem install sinatra json hmac
#
# 3. 在 http://localhost:8000 地址上运行服务器
# ruby server.rb
require 'sinatra'
require 'json'
require 'openssl'
post '/webhook' do
secret_key = "<YOUR_S2S_KEY>" # 请替换为您的实际 Webhook Secret Key
payload = request.body.read
timestamp = request.env["HTTP_X_AGHANIM_SIGNATURE_TIMESTAMP"]
received_signature = request.env["HTTP_X_AGHANIM_SIGNATURE"]
unless verify_signature(secret_key, payload, timestamp, received_signature)
halt 403, "Invalid signature"
end
data = JSON.parse(payload)
event_type = data["event_type"]
event_data = data["event_data"]
if event_type == "item.add"
add_item(event_data)
return { status: "ok" }.to_json
end
if event_type == "item.remove"
remove_item(event_data)
return { status: "ok" }.to_json
end
halt 400, "Unknown event type"
end
def verify_signature(secret_key, payload, timestamp, received_signature)
signature_data = "#{timestamp}.#{payload}"
computed_signature = OpenSSL::HMAC.hexdigest('sha256', secret_key, signature_data)
OpenSSL.secure_compare(computed_signature, received_signature)
end
def add_item(event_data)
# 用于处理事件和添加商品的示例��占位代码。
# 在实际应用中,此函数将与您的数据库或库存管理系统进行交互。
player_id = event_data["player_id"]
for item in event_data["items"] do
sku = item["sku"]
puts "Item #{sku} has been credited to player's #{player_id} account."
end
end
def remove_item(event_data)
# 用于处理事件和移除商品的示例占位代码。
# 在实际应用中,此函数将与您的数据库或库存管理系统进行交互。
player_id = event_data["player_id"]
for item in event_data["items"] do
sku = item["sku"]
puts "Item #{sku} has been removed from player's #{player_id} account."
end
end
if __FILE__ == $0
require 'sinatra'
set :bind, '0.0.0.0'
set :port, 8000
end
// 使用以下示例代码来处理您集成环境中的 Webhook 事件。
//
// 1. 将此代码复制到新创建的 `server.js` 文件中。
//
// 2. 安装必要的依赖项:
//    npm install express
//
// 3. 在 http://localhost:8000 地址上运行服务器
//    node server.js

const express = require('express');
const crypto = require('crypto');

const app = express();

app.post('/webhook', express.raw({ type: "*/*" }), async (req, res) => {
  const secretKey = '<YOUR_S2S_KEY>'; // 请替换为您的实际 Webhook Secret Key

  const rawPayload = req.body;
  const timestamp = req.headers['x-aghanim-signature-timestamp'];
  const receivedSignature = req.headers['x-aghanim-signature'];

  if (!verifySignature(secretKey, rawPayload, timestamp, receivedSignature)) {
    return res.status(403).send('Invalid signature');
  }

  const payload = JSON.parse(req.body);
  const { event_type, event_data } = payload;

  if (event_type === 'item.add') {
    addItem(event_data);
    return res.json({ status: 'ok' });
  }

  if (event_type === 'item.remove') {
    removeItem(event_data);
    return res.json({ status: 'ok' });
  }

  return res.status(400).send('Unknown event type');
});

function verifySignature(secretKey, payload, timestamp, receivedSignature) {
  const signatureData = `${timestamp}.${payload}`;
  const computedSignature = crypto
    .createHmac('sha256', secretKey)
    .update(signatureData)
    .digest('hex');
  return crypto.timingSafeEqual(Buffer.from(computedSignature), Buffer.from(receivedSignature));
}

function addItem(event_data) {
  // 用于处理事件和添加商品的示例占位代码。
  // 在实际应用中,此函数将与您的数据库或库存管理系统进行交互。
  const playerId = event_data.player_id;
  for (const item of event_data.items) {
    const sku = item.sku;
    console.log(`Item ${item.sku} has been credited to player's ${playerId} account.`);
 }
}

function removeItem(event_data) {
  // 用于处理事件和移除商品的示例占位代码。
  // 在实际应用中,此函数将与您的数据库或库存管理系统进行交互。
  const playerId = event_data.player_id;
  for (const item of event_data.items) {
    const sku = item.sku;
    console.log(`Item ${item.sku} has been removed from player's ${playerId} account.`);
 }
}

app.listen(8000, () => {
  console.log('Server is running on http://localhost:8000');
});
// 使用以下示例代码来处理您集成环境中的 Webhook 事件。
//
// 1. 将此代码复制到新创建的 `server.go` 文件中。
//
// 2. 在 http://localhost:8000 地址上运行服务器
// go run server.go
package main
import (
"crypto/hmac"
"crypto/sha256"
"encoding/hex"
"encoding/json"
"fmt"
"io/ioutil"
"net/http"
)
func webhookHandler(w http.ResponseWriter, r *http.Request) {
secretKey := "<YOUR_S2S_KEY>" // 请替换为您的实际 Webhook Secret Key
rawPayload, _ := ioutil.ReadAll(r.Body)
payload := string(rawPayload)
timestamp := r.Header.Get("X-Aghanim-Signature-Timestamp")
receivedSignature := r.Header.Get("X-Aghanim-Signature")
if !verifySignature(secretKey, payload, timestamp, receivedSignature) {
http.Error(w, "Invalid signature", http.StatusForbidden)
return
}
var data map[string]interface{}
if err := json.Unmarshal(rawPayload, &data); err != nil {
http.Error(w, "Invalid payload", http.StatusBadRequest)
return
}
eventType := data["event_type"].(string)
eventData := data["event_data"].(map[string]interface{})
if eventType == "item.add" {
addItem(eventData)
w.WriteHeader(http.StatusOK)
json.NewEncoder(w).Encode(map[string]string{"status": "ok"})
return
}
if eventType == "item.remove" {
removeItem(eventData)
w.WriteHeader(http.StatusOK)
json.NewEncoder(w).Encode(map[string]string{"status": "ok"})
return
}
http.Error(w, "Unknown event type", http.StatusBadRequest)
}
func verifySignature(secretKey, payload, timestamp, receivedSignature string) bool {
signatureData := fmt.Sprintf("%s.%s", timestamp, payload)
mac := hmac.New(sha256.New, []byte(secretKey))
mac.Write([]byte(signatureData))
computedSignature := hex.EncodeToString(mac.Sum(nil))
return hmac.Equal([]byte(computedSignature), []byte(receivedSignature))
}
func addItem(eventData map[string]interface{}) {
// 用�于处理事件和添加商品的示例占位代码。
// 在实际应用中,此函数将与您的数据库或库存管理系统进行交互。
playerID := eventData["player_id"].(string)
items := eventData["items"].([]interface{})
for _, item := range items {
itemMap := item.(map[string]interface{})
sku := itemMap["sku"].(string)
fmt.Printf("Item %s has been credited to player's %s account.\\n", sku, playerID)
}
}
func removeItem(eventData map[string]interface{}) {
// 用于处理事件和移除商品的示例占位代码。
// 在实际应用中,此函数将与您的数据库或库存管理系统进行交互。
playerID := eventData["player_id"].(string)
items := eventData["items"].([]interface{})
for _, item := range items {
itemMap := item.(map[string]interface{})
sku := itemMap["sku"].(string)
fmt.Printf("Item %s has been removed from player's %s account.\\n", sku, playerID)
}
}
func main() {
http.HandleFunc("/webhook", webhookHandler)
fmt.Println("Server is running on http://localhost:8000")
http.ListenAndServe(":8000", nil)
}
Add webhook endpoint to Aghanim
When the webhook handling is ready, add the endpoint to the account so the Aghanim could start sending the events.
- Dashboard
- API
- Go to Integration → Webhooks.
- Click Add webhook. The site will open the Create webhook window.
- Cope and paste the URL
https://<YOUR_DOMAIN>/webhook. - Click Select events. The site will open the Select events to send window.
- Expand the Main class and select the Item add, Item remove checkboxes.
- Click Apply.
- Click Add. The site will redirect you to the webhook page.
- Click Back.
- cURL
- Python
- Ruby
- Node.js
- Go
curl -X POST https://api.aghanim.com/s2s/v1/webhooks \
  -H 'Content-Type: application/json' \
  -H 'Authorization: Bearer <YOUR_S2S_KEY>' \
  -d '{
    "events": [
      "item.add",
      "item.remove"
    ],
    "url": "https://<YOUR_DOMAIN>/webhook",
    "description": "The endpoint for all webhooks",
    "method": "POST",
    "enabled": true,
    "enabled_logs": true,
    "player_context_enabled": true
  }'
import requests

def create_webhook():
    payload = {
        "events": ["item.add", "item.remove"],
        "url": "https://<YOUR_DOMAIN>/webhook",
        "description": "The endpoint for all webhooks",
        "method": "POST",
        "enabled": True,
        "enabled_logs": True,
        "player_context_enabled": True
    }

    headers = {"Authorization": "Bearer <YOUR_S2S_KEY>", "Content-Type": "application/json"}
    resp = requests.post("https://api.aghanim.com/s2s/v1/webhooks", json=payload, headers=headers)
    return resp.json()
require 'net/http'
require 'json'
require 'uri'

def create_webhook
  uri = URI("https://api.aghanim.com/s2s/v1/webhooks")
  req = Net::HTTP::Post.new(uri, 'Content-Type' => 'application/json', 'Authorization' => 'Bearer <YOUR_S2S_KEY>')
  req.body = {
    events: ["item.add", "item.remove"],
    url: "https://<YOUR_DOMAIN>/webhook",
    description: "The endpoint for all webhooks",
    method: "POST",
    enabled: true,
    enabled_logs: true,
    player_context_enabled: true
  }.to_json

  res = Net::HTTP.start(uri.hostname, uri.port, use_ssl: true) { |http| http.request(req) }
  JSON.parse(res.body)
end
const axios = require('axios');

async function createWebhook() {
  const payload = {
    events: ["item.add", "item.remove"],
    url: "https://<YOUR_DOMAIN>/webhook",
    description: "The endpoint for all webhooks",
    method: "POST",
    enabled: true,
    enabled_logs: true,
    player_context_enabled: true
  };

  const res = await axios.post('https://api.aghanim.com/s2s/v1/webhooks', payload, {
    headers: { 'Authorization': 'Bearer <YOUR_S2S_KEY>', 'Content-Type': 'application/json' }
  });
  return res.data;
}
package main

import (
	"bytes"
	"encoding/json"
	"net/http"
)

func createWebhook() map[string]interface{} {
	payload := map[string]interface{}{
		"events":                 []string{"item.add", "item.remove"},
		"url":                    "https://<YOUR_DOMAIN>/webhook",
		"description":            "The endpoint for all webhooks",
		"method":                 "POST",
		"enabled":                true,
		"enabled_logs":           true,
		"player_context_enabled": true,
	}
	data, _ := json.Marshal(payload)

	req, _ := http.NewRequest("POST", "https://api.aghanim.com/s2s/v1/webhooks", bytes.NewBuffer(data))
	req.Header.Set("Authorization", "Bearer <YOUR_S2S_KEY>")
	req.Header.Set("Content-Type", "application/json")

	client := &http.Client{}
	resp, _ := client.Do(req)
	defer resp.Body.Close()

	var webhook map[string]interface{}
	json.NewDecoder(resp.Body).Decode(&webhook)
	return webhook
}
Test your integration
After you have handled the webhooks, check that the purchased items are in your inventory. That’s all.
Next steps
- See Currency codes and minor units to learn how the Aghanim represents monetary amounts.
- See Payment Webhook to learn about the payment progress when the player visits the payment form.
Troubleshooting
- Make sure the External Dependency Manager is installed.
- Check if all dependencies are resolved in the
CheckoutSdkDependencies.xmlfile.
- Verify that the deep link scheme for your app is properly configured in Android Manifest.
- Check that the deep link handler is set up in Unity build settings.
FAQ
需要技术支持?
联系我们的集成技术团队: integration@aghanim.com